7.1.5. Transformers
简介
GET STARTED:
provides a quick tour of the library and installation instructions to get up and running.
TUTORIALS:
are a great place to start if you’re a beginner.
This section will help you gain the basic skills you need to start using the library.
HOW-TO GUIDES:
show you how to achieve a specific goal,
like finetuning a pretrained model for language modeling
or how to write and share a custom model.
CONCEPTUAL GUIDES:
offers more discussion and explanation of the underlying concepts
    and ideas behind models, tasks, and the design philosophy of 🤗 Transformers.
API: describes all classes and functions:
MAIN CLASSES
    details the most important classes like configuration, model, tokenizer, and pipeline.
MODELS
    details the classes and functions related to each model implemented in the library.
INTERNAL
    HELPERS details utility classes and functions used internally.
GET STARTED
Quick tour
安装:
pip install transformers datasets
# optional
sentiment
pip install tensorflow
Pipeline
Task List:
+------------------------------+-----------------+-----------------------------------------------+
| Task                         | Modality        | Pipeline identifier                           |
+==============================+=================+===============================================+
| Text classification          | NLP             | pipeline(task="sentiment-analysis")           |
+------------------------------+-----------------+-----------------------------------------------+
| Text generation              | NLP             | pipeline(task="text-generation")              |
+------------------------------+-----------------+-----------------------------------------------+
| Summarization                | NLP             | pipeline(task="summarization")                |
+------------------------------+-----------------+-----------------------------------------------+
| Image classification         | Computer vision | pipeline(task="image-classification")         |
+------------------------------+-----------------+-----------------------------------------------+
| Image segmentation           | Computer vision | pipeline(task="image-segmentation")           |
+------------------------------+-----------------+-----------------------------------------------+
| Object detection             | Computer vision | pipeline(task="object-detection")             |
+------------------------------+-----------------+-----------------------------------------------+
| Audio classification         | Audio           | pipeline(task="audio-classification")         |
+------------------------------+-----------------+-----------------------------------------------+
| Automatic speech recognition | Audio           | pipeline(task="automatic-speech-recognition") |
+------------------------------+-----------------+-----------------------------------------------+
| Visual question answering    | Multimodal      | pipeline(task="vqa")                          |
+------------------------------+-----------------+-----------------------------------------------+
| Document question answering  | Multimodal      | pipeline(task="document-question-answering")  |
+------------------------------+-----------------+-----------------------------------------------+
| Image captioning             | Multimodal      | pipeline(task="image-to-text")                |
+------------------------------+-----------------+-----------------------------------------------+
>>> from transformers import pipeline

>>> classifier = pipeline("sentiment-analysis")
>>> classifier("We are very happy to show you the 🤗 Transformers library.")
[{'label': 'POSITIVE', 'score': 0.9998}]
Example: iterate over an entire dataset of automatic speech:
import torch
from transformers import pipeline

# 语音识别pipeline(speech_recognizer)
sr = pipeline("automatic-speech-recognition", model="facebook/wav2vec2-base-960h")

# 载入数据
from datasets import load_dataset, Audio
dataset = load_dataset("PolyAI/minds14", name="en-US", split="train")

# 确保相同的 sampling rate
dataset = dataset.cast_column("audio", Audio(sampling_rate=sr.feature_extractor.sampling_rate))

# 执行task
result = sr(dataset[:4]["audio"])
print([d["text"] for d in result])
Example: Use another model and tokenizer in the pipeline:
model_name = "nlptown/bert-base-multilingual-uncased-sentiment"

from transformers import AutoTokenizer, AutoModelForSequenceClassification

model = AutoModelForSequenceClassification.from_pretrained(model_name)
tokenizer = AutoTokenizer.from_pretrained(model_name)

# 指定model和tokenizer
classifier = pipeline("sentiment-analysis", model=model, tokenizer=tokenizer)

# 执行
classifier("Nous sommes très heureux de vous présenter la bibliothèque 🤗 Transformers.")
AutoClass
AutoTokenizer:
from transformers import AutoTokenizer

model_name = "nlptown/bert-base-multilingual-uncased-sentiment"
tokenizer = AutoTokenizer.from_pretrained(model_name)

# Pass your text to the tokenizer:
encoding = tokenizer("We are very happy to show you the 🤗 Transformers library.")
print(encoding)
# {
#         'input_ids': [101, 11312, 10320, 12495, 19308, 10114, 11391, 10855, 10103, 100, 58263, 13299, 119, 102],
#        'token_type_ids': [0, 0, 0, 0, 0, 0, 0, 0, 0, 0, 0, 0, 0, 0],
#        'attention_mask': [1, 1, 1, 1, 1, 1, 1, 1, 1, 1, 1, 1, 1, 1]
# }

# accept a list of inputs, and pad and truncate the text to return a batch with uniform length
pt_batch = tokenizer(
    ["We are very happy to show you the 🤗 Transformers library.", "We hope you don't hate it."],
    padding=True,
    truncation=True,
    max_length=512,
    return_tensors="pt",
)
AutoModel:
# For text (or sequence) classification, you should load `AutoModelForSequenceClassification`
from transformers import AutoModelForSequenceClassification

model_name = "nlptown/bert-base-multilingual-uncased-sentiment"
pt_model = AutoModelForSequenceClassification.from_pretrained(model_name)

# pass your preprocessed batch of inputs directly to the model
pt_outputs = pt_model(**pt_batch)

from torch import nn

# outputs the final activations in the logits attribute
>>> pt_predictions = nn.functional.softmax(pt_outputs.logits, dim=-1)
>>> print(pt_predictions)
tensor([[0.0021, 0.0018, 0.0115, 0.2121, 0.7725],
        [0.2084, 0.1826, 0.1969, 0.1755, 0.2365]], grad_fn=<SoftmaxBackward0>)
Save a model:
pt_save_directory = "./pt_save_pretrained"
tokenizer.save_pretrained(pt_save_directory)
pt_model.save_pretrained(pt_save_directory)

# load
pt_model = AutoModelForSequenceClassification.from_pretrained("./pt_save_pretrained")
Custom model builds
# 使用AutoConfig加载要修改的预训练模型生成自定义配置
from transformers import AutoConfig
my_config = AutoConfig.from_pretrained("distilbert-base-uncased", n_heads=12)

# 使用AutoModel基于自定义配置创建模型
from transformers import AutoModel
my_model = AutoModel.from_config(my_config)
Trainer
A PreTrainedModel or a torch.nn.Module:
from transformers import AutoModelForSequenceClassification
model = AutoModelForSequenceClassification.from_pretrained("distilbert-base-uncased")
TrainingArguments 包含可以更改的模型超参数,例如学习率、批量大小和要训练的周期数:
from transformers import TrainingArguments

training_args = TrainingArguments(
    output_dir="path/to/save/folder/",
    learning_rate=2e-5,
    per_device_train_batch_size=8,
    per_device_eval_batch_size=8,
    num_train_epochs=2,
)
预处理类,如tokenizer, image processor, feature extractor, or processor:
from transformers import AutoTokenizer
tokenizer = AutoTokenizer.from_pretrained("distilbert-base-uncased")
加载数据集:
from datasets import load_dataset
dataset = load_dataset("rotten_tomatoes")  # doctest: +IGNORE_RESULT
使用map应用整个数据集:
def tokenize_dataset(dataset):
    return tokenizer(dataset["text"])

dataset = dataset.map(tokenize_dataset, batched=True)
使用DataCollatorWithPadding从数据集创建一批示例:
from transformers import DataCollatorWithPadding
data_collator = DataCollatorWithPadding(tokenizer=tokenizer)
使用Trainer:
from transformers import Trainer

trainer = Trainer(
    model=model,
    args=training_args,
    train_dataset=dataset["train"],
    eval_dataset=dataset["test"],
    tokenizer=tokenizer,
    data_collator=data_collator,
)  # doctest: +SKIP
开始训练:
trainer.train()
Installation
default install:
pip install transformers

# 验证
python -c "from transformers import pipeline; print(pipeline('sentiment-analysis')('we love you'))"
cpu版安装(install Transformers and a deep learning library in one line):
pip install 'transformers[torch]'         # 安装 🤗 Transformers 和 PyTorch

pip install 'transformers[tf-cpu]'        # 安装 🤗 Transformers 和 TensorFlow 2.0
源码安装:
pip install git+https://github.com/huggingface/transformers


git clone https://github.com/huggingface/transformers.git
cd transformers
pip install -e .
检查是否安装正确:
python -c "from transformers import pipeline; print(pipeline('sentiment-analysis')('we love you'))"

# 查看版本
print(transformers.__version__)
附加模块:
pip install 'transformers[audio]'
pip install 'transformers[torch]'
pip install 'transformers[tf-cpu]'
环境变量
使用conda下载的模型文件地址:
<env_path>/lib/pythonX.Y/site-packages/transformers/models
示例:
/home/username/miniconda/envs/myenv/lib/python3.7/site-packages/transformers/models


每个环境都有自己的模型文件副本,并且环境之间相互隔离。
可以通过设置`TRANSFORMERS_CACHE`环境变量来覆盖这一默认行为
Fetch models and tokenizers to use offline
Use the from_pretrained() and save_pretrained() workflow
Download your files ahead of time with PreTrainedModel.from_pretrained():
from transformers import AutoTokenizer, AutoModelForSeq2SeqLM

tokenizer = AutoTokenizer.from_pretrained("bigscience/T0_3B")
model = AutoModelForSeq2SeqLM.from_pretrained("bigscience/T0_3B")
Save your files to a specified directory with PreTrainedModel.save_pretrained():
tokenizer.save_pretrained("./your/path/bigscience_t0")
model.save_pretrained("./your/path/bigscience_t0")
Now when you’re offline, reload your files with PreTrainedModel.from_pretrained() from the specified directory:
tokenizer = AutoTokenizer.from_pretrained("./your/path/bigscience_t0")
model = AutoModel.from_pretrained("./your/path/bigscience_t0")
Programmatically download files with the huggingface_hub library
Install the huggingface_hub library in your virtual environment:
python -m pip install huggingface_hub
Use the hf_hub_download function to download a file to a specific path:
from huggingface_hub import hf_hub_download

hf_hub_download(repo_id="bigscience/T0_3B", filename="config.json", cache_dir="./your/path/bigscience_t0")
Once your file is downloaded and locally cached, specify it’s local path to load and use it:
from transformers import AutoConfig
config = AutoConfig.from_pretrained("./your/path/bigscience_t0/config.json")
TUTORIALS
Pipelines for inference
Start by creating a pipeline() and specify an inference task:
from transformers import pipeline
generator = pipeline(task="automatic-speech-recognition")
Pass your input text to the pipeline():
generator("https://huggingface.co/datasets/Narsil/asr_dummy/resolve/main/mlk.flac")
{'text': 'I HAVE A DREAM BUT ONE DAY THIS NATION WILL RISE UP LIVE UP THE TRUE MEANING OF ITS TREES'}
Load pretrained instances with an AutoClass
备注
Remember, architecture refers to the skeleton of the model and checkpoints are the weights for a given architecture. For example, BERT is an architecture, while bert-base-uncased is a checkpoint. Model is a general term that can mean either architecture or checkpoint.
AutoTokenizer
备注
Nearly every NLP task begins with a tokenizer. A tokenizer converts your input into a format that can be processed by the model.
Load a tokenizer with AutoTokenizer.from_pretrained():
from transformers import AutoTokenizer
tokenizer = AutoTokenizer.from_pretrained("bert-base-uncased")
tokenize your input as shown below:
>>> sequence = "In a hole in the ground there lived a hobbit."
>>> encoded_input=tokenizer(sequence)
>>> print(encoded_input)
{'input_ids': [101, 1999, 1037, 4920, ...],
 'token_type_ids': [0, 0, 0, 0, 0, 0, ...],
 'attention_mask': [1, 1, 1, 1, 1, 1, ...]}
Return your input by decoding the input_ids:
>>> tokenizer.decode(encoded_input["input_ids"])
"[CLS] in a hole in the ground there lived a hobbit.[SEP]"
# 说明: two special tokens
# CLS: classifier
# SEP: separator
AutoImageProcessor
For vision tasks, an image processor processes the image into the correct input format:
from transformers import AutoImageProcessor
image_processor = AutoImageProcessor.from_pretrained("google/vit-base-patch16-224")
AutoFeatureExtractor
For audio tasks, a feature extractor processes the audio signal the correct input format:
from transformers import AutoFeatureExtractor
feature_extractor = AutoFeatureExtractor.from_pretrained("facebook/wav2vec2-base")
AutoProcessor
Multimodal tasks require a processor that combines two types of preprocessing tools.
For example, the
LayoutLMV2model requires an image processor to handle images and a tokenizer to handle text; a processor combines both of them.
from transformers import AutoProcessor
processor = AutoProcessor.from_pretrained("microsoft/layoutlmv2-base-uncased")
AutoModel
AutoModelFor classes let you load a pretrained model for a given task(sequence classification):
from transformers import AutoModelForSequenceClassification
model = AutoModelForSequenceClassification.from_pretrained("distilbert-base-uncased")
reuse the same checkpoint to load an architecture for a different task(token classification):
from transformers import AutoModelForTokenClassification
model = AutoModelForTokenClassification.from_pretrained("distilbert-base-uncased")
备注
Generally, we recommend using the AutoTokenizer class and the AutoModelFor class to load pretrained instances of models. This will ensure you load the correct architecture every time.
Preprocess data
Before you can train a model on a dataset, it needs to be preprocessed into the expected model input format.
Whether your data is text, images, or audio, they need to be converted and assembled into batches of tensors.
Transformers provides a set of preprocessing classes to help prepare your data for the model:
1. Text
    use `Tokenizer` to convert text into a sequence of tokens, and assemble them into tensors.
2. Speech and audio
    use `Feature` extractor to extract sequential features
        from audio waveforms and convert them into tensors.
3. Image inputs
    use `ImageProcessor` to convert images into tensors.
4. Multimodal inputs,
    use `Processor` to combine a tokenizer and a feature extractor or image processor.
备注
AutoProcessor always works and automatically chooses the correct class for the model you’re using, whether you’re using a tokenizer, image processor, feature extractor or processor.
Natural Language Processing
The main tool for preprocessing textual data is a tokenizer.
A tokenizer splits text into tokens according to a set of rules.
The tokens are converted into numbers and then tensors, which become the model inputs.
Any additional inputs required by the model are added by the tokenizer.
Pad
Sentences aren’t always the same length which can be an issue because tensors, the model inputs, need to have a uniform shape.
Padding is a strategy for ensuring tensors are rectangular by adding a special padding token to shorter sentences.
示例:
>>> batch_sentences = [
>>>     "But what about second breakfast?",
>>>     "Don't think he knows about second breakfast, Pip.",
>>>     "What about elevensies?",
>>> ]
>>> encoded_input = tokenizer(batch_sentences, padding=True)
>>> print(encoded_input)
{'input_ids': [[101, 1252, 1184, 1164, ..., 0, 0, 0, 0, 0, 0, 0],
               [101, 1790, 112, 189, ..., 6462, 117, 21902, 1643, 119, 102],
               [101, 1327, 1164, 545, ..., 0, 0, 0, 0, 0, 0, 0, 0]],
 'token_type_ids': [[0, 0, 0, 0, 0, 0, 0, 0, 0, 0, 0, 0, 0, 0, 0],
                    [0, 0, 0, 0, 0, 0, 0, 0, 0, 0, 0, 0, 0, 0, 0],
                    [0, 0, 0, 0, 0, 0, 0, 0, 0, 0, 0, 0, 0, 0, 0]],
 'attention_mask': [[1, 1, 1, 1, 1, 1, 1, 1, 0, 0, 0, 0, 0, 0, 0],
                    [1, 1, 1, 1, 1, 1, 1, 1, 1, 1, 1, 1, 1, 1, 1],
                    [1, 1, 1, 1, 1, 1, 1, 0, 0, 0, 0, 0, 0, 0, 0]]}
Truncation
On the other end of the spectrum, sometimes a sequence may be too long for a model to handle.
In this case, you’ll need to truncate the sequence to a shorter length.
Set the truncation parameter to True to truncate a sequence to the maximum length accepted by the model
示例:
>>> batch_sentences = [
>>>     "But what about second breakfast?",
>>>     "Don't think he knows about second breakfast, Pip.",
>>>     "What about elevensies?",
>>> ]
>>> encoded_input = tokenizer(batch_sentences, padding=True, truncation=True)
>>> print(encoded_input)
{'input_ids': [[101, 1252, 1184, 1164, ..., 0, 0, 0, 0, 0, 0, 0],
               [101, 1790, 112, 189, ..., 6462, 117, 21902, 1643, 119, 102],
               [101, 1327, 1164, 545, ..., 0, 0, 0, 0, 0, 0, 0, 0]],
 'token_type_ids': [[0, 0, 0, 0, 0, 0, 0, 0, 0, 0, 0, 0, 0, 0, 0],
                    [0, 0, 0, 0, 0, 0, 0, 0, 0, 0, 0, 0, 0, 0, 0],
                    [0, 0, 0, 0, 0, 0, 0, 0, 0, 0, 0, 0, 0, 0, 0]],
 'attention_mask': [[1, 1, 1, 1, 1, 1, 1, 1, 0, 0, 0, 0, 0, 0, 0],
                    [1, 1, 1, 1, 1, 1, 1, 1, 1, 1, 1, 1, 1, 1, 1],
                    [1, 1, 1, 1, 1, 1, 1, 0, 0, 0, 0, 0, 0, 0, 0]]}
Build tensors
Finally, you want the tokenizer to return the actual tensors that get fed to the model.
Set the return_tensors parameter to either pt for PyTorch, or tf for TensorFlow
示例:
>> batch_sentences = [
>>     "But what about second breakfast?",
>>     "Don't think he knows about second breakfast, Pip.",
>>     "What about elevensies?",
>> ]
>> encoded_input = tokenizer(batch_sentences, padding=True, truncation=True, return_tensors="pt")
>> print(encoded_input)
{'input_ids': tensor([[101, 1252, 1184, 1164, 1248, 6462, 136, 102, 0, 0, 0, 0, 0, 0, 0],
                      [101, 1790, 112, 189, 1341, 1119, 3520, 1164, 1248, 6462, 117, 21902, 1643, 119, 102],
                      [101, 1327, 1164, 5450, 23434, 136, 102, 0, 0, 0, 0, 0, 0, 0, 0]]),
 'token_type_ids': tensor([[0, 0, 0, 0, 0, 0, 0, 0, 0, 0, 0, 0, 0, 0, 0],
                           [0, 0, 0, 0, 0, 0, 0, 0, 0, 0, 0, 0, 0, 0, 0],
                           [0, 0, 0, 0, 0, 0, 0, 0, 0, 0, 0, 0, 0, 0, 0]]),
 'attention_mask': tensor([[1, 1, 1, 1, 1, 1, 1, 1, 0, 0, 0, 0, 0, 0, 0],
                           [1, 1, 1, 1, 1, 1, 1, 1, 1, 1, 1, 1, 1, 1, 1],
                           [1, 1, 1, 1, 1, 1, 1, 0, 0, 0, 0, 0, 0, 0, 0]])}
Audio
For audio tasks, you’ll need a
feature extractorto prepare your dataset for the model.The feature extractor is designed to extract features from raw audio data, and convert them into tensors.
备注
Remember you should always resample your audio dataset’s sampling rate to match the sampling rate of the dataset used to pretrain a model!
获取数据:
from datasets import load_dataset, Audio
dataset = load_dataset("PolyAI/minds14", name="en-US", split="train")

# upsample the sampling rate to 16kHz:
dataset = dataset.cast_column("audio", Audio(sampling_rate=16_000))
Load the feature extractor:
from transformers import AutoFeatureExtractor
feature_extractor = AutoFeatureExtractor.from_pretrained("facebook/wav2vec2-base")
Pass the audio array to the feature extractor:
audio_input = [dataset[0]["audio"]["array"]]
feature_extractor(audio_input, sampling_rate=16000)
Pading
查看数据长度:
dataset[0]["audio"]["array"].shape
(173398,)

dataset[1]["audio"]["array"].shape
(106496,)
补齐:
def preprocess_function(examples):
    audio_arrays = [x["array"] for x in examples["audio"]]
    inputs = feature_extractor(
        audio_arrays,
        sampling_rate=16000,
        padding=True,
        max_length=100000,
        truncation=True,
    )
    return inputs
processed_dataset = preprocess_function(dataset[:5])
两次查看数据长度:
dataset[0]["audio"]["array"].shape
(100000,)

dataset[1]["audio"]["array"].shape
(100000,)
Computer vision
For computer vision tasks, you’ll need an
image processorto prepare your dataset for the model.Image preprocessing consists of several steps that convert images into the input expected by the model.
These steps include but are not limited to resizing, normalizing, color channel correction, and converting images to tensors.
载入数据:
from datasets import load_dataset
dataset = load_dataset("food101", split="train[:100]")
查看图片:
dataset[0]["image"]
Load the image processor:
from transformers import AutoImageProcessor
image_processor = AutoImageProcessor.from_pretrained("google/vit-base-patch16-224")
image augmentation
备注
这儿用的是torchvision’s transforms module,还可以用其他图像增强方法,如: Albumentations 和 Kornia
resizing:
from torchvision.transforms import RandomResizedCrop, ColorJitter, Compose

size = (
    image_processor.size["shortest_edge"]
    if "shortest_edge" in image_processor.size
    else (image_processor.size["height"], image_processor.size["width"])
)

# 随机裁剪和变化颜色
# RandomResizedCrop会随机裁剪图片的区域。
# ColorJitter会随机改变图像的亮度、对比度等参数。
_transforms = Compose([RandomResizedCrop(size), ColorJitter(brightness=0.5, hue=0.5)])
combines image augmentation and image preprocessing for a batch of images and generates pixel_values:
# 对每个图像example应用_transforms
# 并将转换后的图像保存在example的pixel_values中
def transforms(examples):
    images = [_transforms(img.convert("RGB")) for img in examples["image"]]
    examples["pixel_values"] = image_processor(images, do_resize=False, return_tensors="pt")["pixel_values"]
    return examples
apply the transforms on the fly:
dataset.set_transform(transforms)
The image has been randomly cropped and it’s color properties are different:
import numpy as np
import matplotlib.pyplot as plt

img = dataset[0]["pixel_values"]
plt.imshow(img.permute(1, 2, 0))
备注
dataset[0][“pixel_values”]每次结果不一样。原因是使用了``dataset.set_transform(transforms)``,每次遍历dataset时,这些随机操作都会重新应用,所以同一个样本经过增强之后的pixel_values就会有所不同。这也正是数据增强的目的,通过随机操作创造更多不同的训练样本,提高模型的泛化能力。总结来说,dataset[0]本身不变,但增强后pixel_values不同,是因为随机增强引起的。这对提高模型鲁棒性是有帮助的。
Pading
def collate_fn(batch):
    pixel_values = [item["pixel_values"] for item in batch]
    encoding = image_processor.pad(pixel_values, return_tensors="pt")
    labels = [item["labels"] for item in batch]
    batch = {}
    batch["pixel_values"] = encoding["pixel_values"]
    batch["pixel_mask"] = encoding["pixel_mask"]
    batch["labels"] = labels
    return batch
在PyTorch中,collate_fn函数的作用是在使用DataLoader加载数据时对一个batch的数据进行预处理。
collate_fn会在每个batch被加载后执行,它接受一个batch的数据作为输入,并返回batch的数据作为输出。
常见的使用collate_fn的场景有:
- 当样本的数据格式不同时,collate_fn可以将其转换为相同格式。
    例如样本包括图像和文本,collate_fn可以将其转换为同样的张量格式。
- 当batch中的样本长度不同时,collate_fn可以通过padding将其补齐到相同长度。
    例如处理NLP任务中的文本数据。
- 对batch中的样本进行额外的预处理
    例如图像增强、文本tokenize等。
- 构建自定义的数据结构作为batch的输出
    例如为检测任务构建(images, targets)的结构。
- 在训练语音识别模型时,collate_fn可以将音频样本padding到相同长度,并构建长度变量等。
Fine-tune a pretrained model
安装包:
!pip install datasets transformers accelerate evaluate
load data:
>>> from datasets import load_dataset
>>> dataset = load_dataset("yelp_review_full")
>>> dataset["train"][100]
{'label': 0,
 'text': 'My expectations for McDonal...'}
token:
from transformers import AutoTokenizer

tokenizer = AutoTokenizer.from_pretrained("bert-base-cased")
model:
from transformers import AutoModelForSequenceClassification
model = AutoModelForSequenceClassification.from_pretrained("bert-base-cased", num_labels=5)
取小部分数据以节省时间(可选):
from datasets import DatasetDict, Dataset

small_train_dataset = dataset["train"].shuffle(seed=42).select(range(100))
small_test_dataset = dataset["test"].shuffle(seed=42).select(range(100))
small_dataset = DatasetDict({
    'train': small_train_dataset,
    'test': small_test_dataset
})
批处理token:
def tokenize_function(examples):
    return tokenizer(examples["text"], padding="max_length", truncation=True)

tokenized_datasets = small_dataset.map(tokenize_function, batched=True)
small_tokenized_train_dataset = tokenized_datasets["train"]
small_tokenized_test_dataset = tokenized_datasets["test"]
Train with PyTorch Trainer
Training hyperparameters
Specify where to save the checkpoints from your training:
from transformers import TrainingArguments
training_args = TrainingArguments(output_dir="test_trainer")
monitor your evaluation metrics during fine-tuning(可选):
from transformers import TrainingArguments, Trainer
training_args = TrainingArguments(output_dir="test_trainer", evaluation_strategy="epoch")
Evaluate
Trainerdoes not automatically evaluate model performance during training.You should add
compute_metricsparam toTrainerobject.
Evaluate library provides a simple accuracy function:
import numpy as np
import evaluate

metric = evaluate.load("accuracy")
convert the predictions to logits (remember all 🤗 Transformers models return logits):
def compute_metrics(eval_pred):
    logits, labels = eval_pred
    predictions = np.argmax(logits, axis=-1)
    return metric.compute(predictions=predictions, references=labels)
Trainer
Create a Trainer object:
trainer = Trainer(
    model=model,
    args=training_args,
    train_dataset=small_tokenized_train_dataset,
    eval_dataset=small_tokenized_eval_dataset,
    compute_metrics=compute_metrics,
)
fine-tune begin:
trainer.train()
Train in native PyTorch
清除环境节省资源:
del model
del trainer
torch.cuda.empty_cache()
manually postprocess tokenized_dataset to prepare it for training:
tokenized_datasets = tokenized_datasets.remove_columns(["text"])
tokenized_datasets = tokenized_datasets.rename_column("label", "labels")

# Set the format of the dataset to return PyTorch tensors instead of lists:
tokenized_datasets.set_format("torch")

small_tokenized_train_dataset = tokenized_datasets["train"]
small_tokenized_test_dataset = tokenized_datasets["test"]
DataLoader
Create a DataLoader:
from torch.utils.data import DataLoader

train_dataloader = DataLoader(small_tokenized_train_dataset, shuffle=True, batch_size=8)
eval_dataloader = DataLoader(small_tokenized_test_dataset, batch_size=8)
Optimizer and learning rate scheduler
Create an optimizer and learning rate scheduler to fine-tune the model:
from torch.optim import AdamW
optimizer = AdamW(model.parameters(), lr=5e-5)
Create the default learning rate scheduler from Trainer:
from transformers import get_scheduler
num_epochs = 3
num_training_steps = num_epochs * len(train_dataloader)
lr_scheduler = get_scheduler(
    name="linear", optimizer=optimizer, num_warmup_steps=0, num_training_steps=num_training_steps
)
specify device to use a GPU:
import torch
device = torch.device("cuda") if torch.cuda.is_available() else torch.device("cpu")
model.to(device)
Training loop
基本的循环训练逻辑:
from tqdm.auto import tqdm

progress_bar = tqdm(range(num_training_steps))

model.train()
for epoch in range(num_epochs):
    for batch in train_dataloader:
        batch = {k: v.to(device) for k, v in batch.items()}
        outputs = model(**batch)       # 前向传播
        loss = outputs.loss
        loss.backward()                # 反向传播计算梯度

        optimizer.step()               # 使用优化器更新参数
        lr_scheduler.step()            # 使用学习率调度器更新学习率
        optimizer.zero_grad()          # 清零优化器的梯度
        progress_bar.update(1)
Evaluate
基本的模型评估逻辑:
import evaluate

metric = evaluate.load("accuracy")    # 加载评估指标
model.eval()                          # 将模型设置为评估模式
for batch in eval_dataloader:
    batch = {k: v.to(device) for k, v in batch.items()}
    with torch.no_grad():             # 关闭autograd engine进行推理
        outputs = model(**batch)      # 模型前向传播计算

    logits = outputs.logits
    predictions = torch.argmax(logits, dim=-1)        # 计算预测类别
    metric.add_batch(predictions=predictions, references=batch["labels"])     # 将预测结果和标签传入metric进行指标计算

metric.compute()                      # 聚合批次结果,得到最终评估指标数量
Train with a script
本节主要展示了如何使用现成的脚本来直接实现相应的功能
主要如下面2个由社区贡献的脚本示例 research projects 和 legacy examples
警告
These scripts are not actively maintained and require a specific version of 🤗 Transformers that will most likely be incompatible with the latest version of the library.
运行脚本示例:
python examples/pytorch/summarization/run_summarization.py \
    --model_name_or_path t5-small \
    --do_train \
    --do_eval \
    --dataset_name cnn_dailymail \
    --dataset_config "3.0.0" \
    --source_prefix "summarize: " \
    --output_dir /tmp/tst-summarization \
    --per_device_train_batch_size=4 \
    --per_device_eval_batch_size=4 \
    --overwrite_output_dir \
    --predict_with_generate
Distributed training with Accelerate
本节主要讲了一个分布式训练的工具:
Accelerate
安装:
pip install accelerate
Backward
使用 Accelerate 只需要做如下修改:
+ from accelerate import Accelerator
  from transformers import AdamW, AutoModelForSequenceClassification, get_scheduler

+ accelerator = Accelerator()

  model = AutoModelForSequenceClassification.from_pretrained(checkpoint, num_labels=2)
  optimizer = AdamW(model.parameters(), lr=3e-5)

- device = torch.device("cuda") if torch.cuda.is_available() else torch.device("cpu")
- model.to(device)

+ train_dataloader, eval_dataloader, model, optimizer = accelerator.prepare(
+     train_dataloader, eval_dataloader, model, optimizer
+ )

  num_epochs = 3
  num_training_steps = num_epochs * len(train_dataloader)
  lr_scheduler = get_scheduler(
      "linear",
      optimizer=optimizer,
      num_warmup_steps=0,
      num_training_steps=num_training_steps
  )

  progress_bar = tqdm(range(num_training_steps))

  model.train()
  for epoch in range(num_epochs):
      for batch in train_dataloader:
-         batch = {k: v.to(device) for k, v in batch.items()}
          outputs = model(**batch)
          loss = outputs.loss
-         loss.backward()
+         accelerator.backward(loss)

          optimizer.step()
          lr_scheduler.step()
          optimizer.zero_grad()
          progress_bar.update(1)
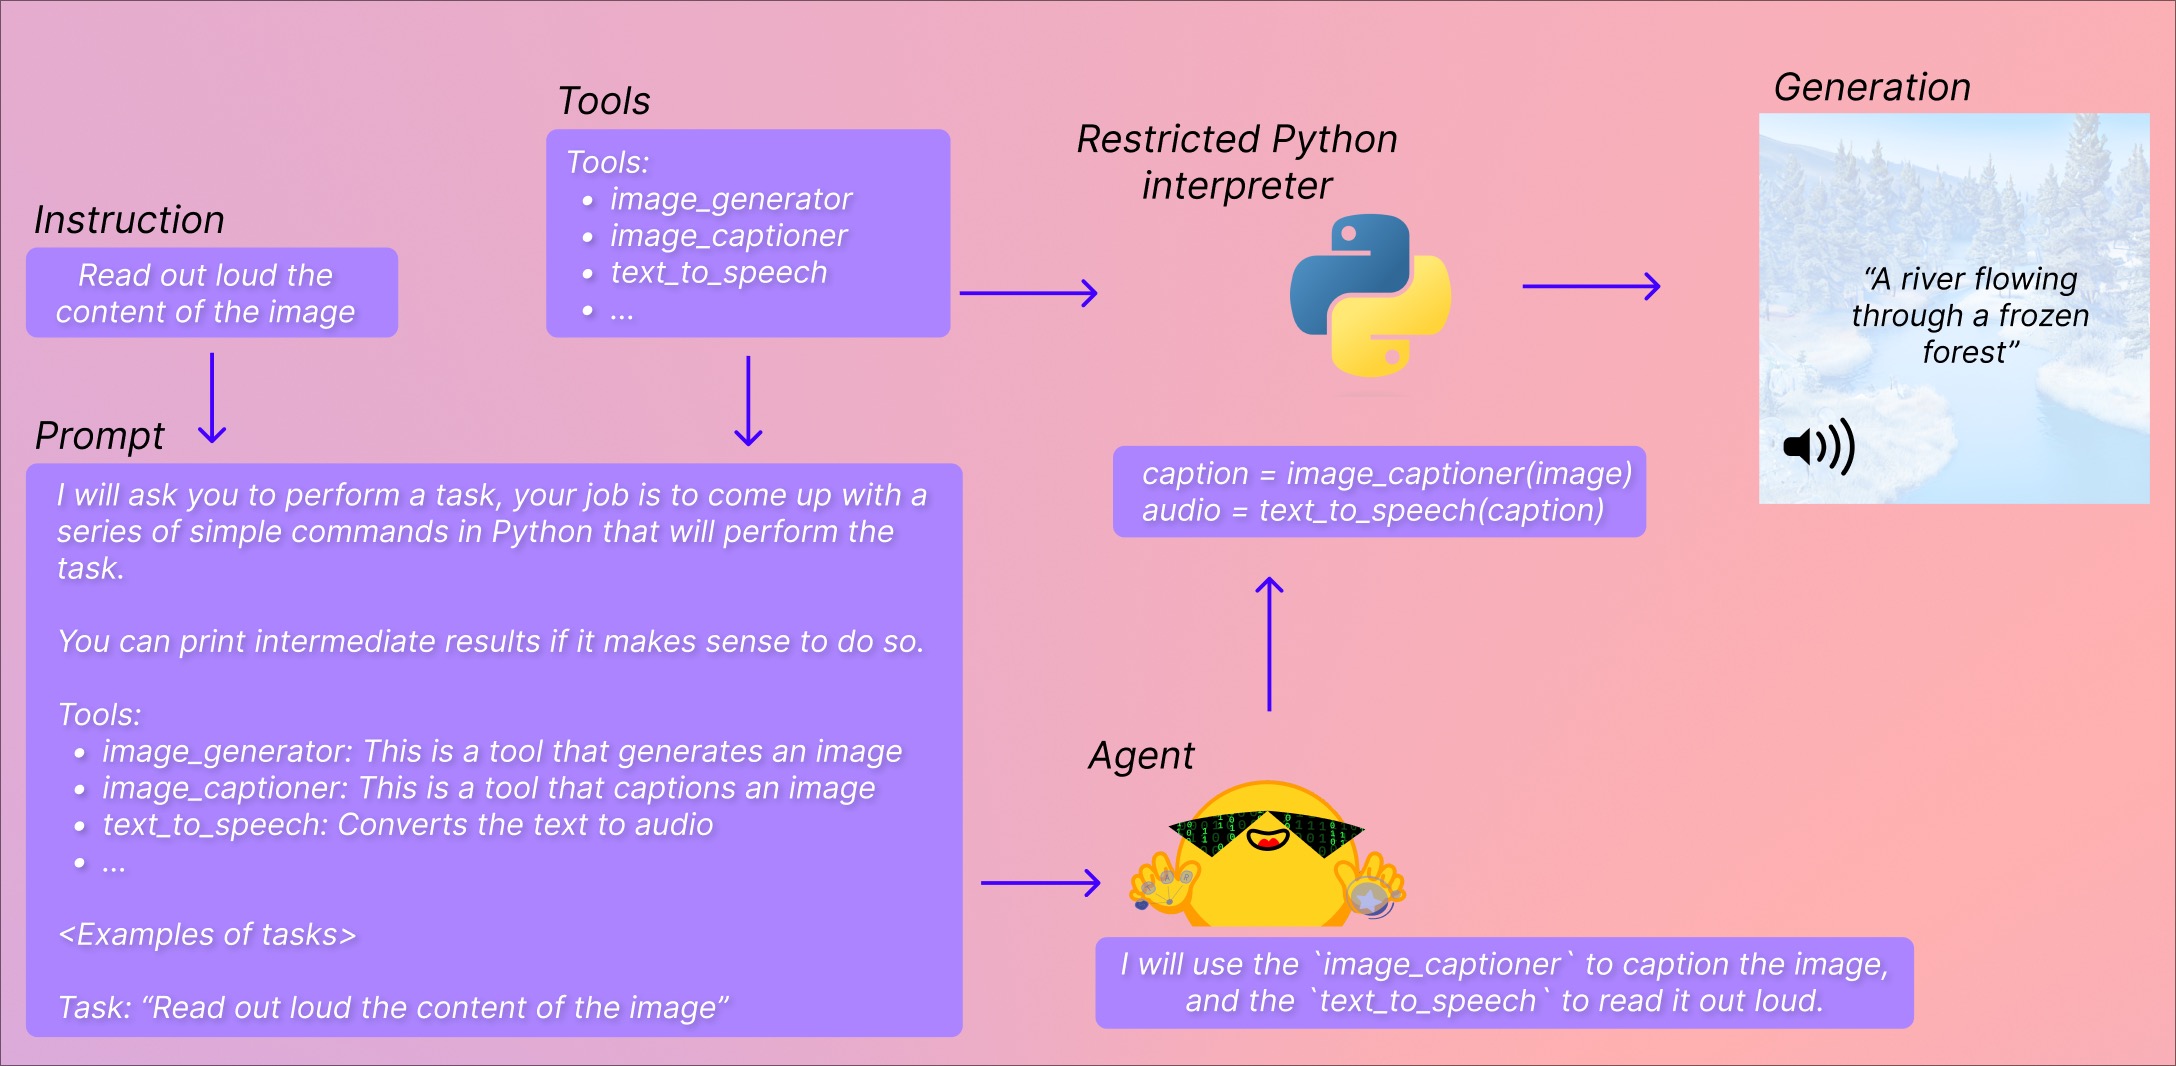
Transformers Agent
警告
Transformers Agent is an experimental API which is subject to change at any time. Results returned by the agents can vary as the APIs or underlying models are prone to change.
building on the concept of tools and agents.
In short, it provides a natural language API on top of transformers: we define a set of curated tools and design an agent to interpret natural language and to use these tools.
示例
命令:
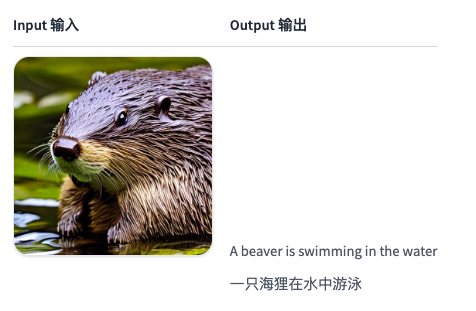
agent.run("Caption the following image", image=image)
命令:
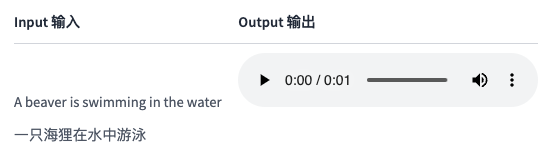
agent.run("Read the following text out loud", text=text)
命令:
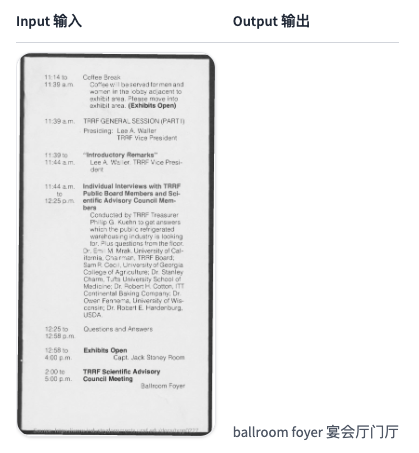
agent.run(
    "In the following `document`, where will the TRRF Scientific Advisory Council Meeting take place?",
    document=document,
)
Quickstart
安装:
pip install transformers[agents]
logging in to have access to the Inference API:
from huggingface_hub import login
login("<YOUR_TOKEN>")
instantiate the agent:
from transformers import HfAgent

# Starcoder
agent = HfAgent("https://api-inference.huggingface.co/models/bigcode/starcoder")
# StarcoderBase
# agent = HfAgent("https://api-inference.huggingface.co/models/bigcode/starcoderbase")
# OpenAssistant
# agent = HfAgent(url_endpoint="https://api-inference.huggingface.co/models/OpenAssistant/oasst-sft-4-pythia-12b-epoch-3.5")

## OpenAI
# pip install openai
# from transformers import OpenAiAgent
# agent = OpenAiAgent(model="text-davinci-003", api_key="<your_api_key>")
Single execution (run)
agent.run("Draw me a picture of rivers and lakes.")


picture = agent.run("Generate a picture of rivers and lakes.")
updated_picture = agent.run("Transform the image in `picture` to add an island to it.", picture=picture)
Chat-based execution (chat)
agent.chat("Generate a picture of rivers and lakes")
agent.chat("Transform the picture so that there is a rock in there")
原理
Agents
The “agent” here is a large language model, and we’re prompting it so that it has access to a specific set of tools.
Tools
Tools are very simple: they’re a single function, with a name, and a description. We then use these tools’ descriptions to prompt the agent. Through the prompt, we show the agent how it would leverage tools to perform what was requested in the query.
Resource
A curated set of tools
Document question answering: given a document (such as a PDF) in image format, answer a question on this document (Donut)
Text question answering: given a long text and a question, answer the question in the text (Flan_T5)
Unconditional image captioning: Caption the image! (BLIP)
Image question answering: given an image, answer a question on this image (VILT)
Image segmentation: given an image and a prompt, output the segmentation mask of that prompt (CLIPSeg)
Speech to text: given an audio recording of a person talking, transcribe the speech into text (Whisper)
Text to speech: convert text to speech (SpeechT5)
Zero-shot text classification: given a text and a list of labels, identify to which label the text corresponds the most (BART)
Text summarization: summarize a long text in one or a few sentences (BART)
Translation: translate the text into a given language (NLLB)
Custom tools
Text downloader: to download a text from a web URL
Text to image: generate an image according to a prompt, leveraging stable diffusion. huggingface-tools/text-to-image
Image transformation: modify an image given an initial image and a prompt, leveraging instruct pix2pix stable diffusion
Text to video: generate a small video according to a prompt, leveraging damo-vilab
Code generation
示例:
>>> agent.run("Draw me a picture of rivers and lakes", return_code=True)

==Code generated by the agent==
from transformers import load_tool
image_generator = load_tool("huggingface-tools/text-to-image")
image = image_generator(prompt="rivers and lakes")
示例:
>>> agent.run("Draw me a picture of the sea then transform the picture to add an island", return_code=True)

==Code generated by the agent==
from transformers import load_tool
image_transformer = load_tool("huggingface-tools/image-transformation")
image_generator = load_tool("huggingface-tools/text-to-image")
image = image_generator(prompt="a picture of the sea")
image = image_transformer(image, prompt="an island")
示例:
>>> picture = agent.run("Generate a picture of rivers and lakes.")
>>> updated_picture = agent.run("Transform the image in `picture` to add an boat to it.", picture=picture, return_code=True)

==Code generated by the agent==
image = image_transformer(image=picture, prompt="a boat")
Practice
TASK GUIDES
NATURAL LANGUAGE PROCESSING
NLP:
Text classification
Token classification
  One of the most common token classification tasks is Named Entity Recognition (NER).
  NER attempts to find a label for each entity in a sentence,
    such as a person, location, or org.
Question answering
Causal language modeling
  Causal language models are frequently used for text generation.
  You can use these models for creative applications
    like choosing your own text adventure or an intelligent coding assistant
        like Copilot or CodeParrot.
Masked language modeling
  it predicts a masked token in a sequence, and the model can attend to tokens bidirectionally
  it is great for tasks that require a good contextual understanding of an entire sequence.
  BERT is an example of a masked language model.
Translation
Summarization
Multiple choice
AUDIO
Audio classification
Automatic speech recognition
COMPUTER VISION
Image classification
Semantic segmentation
  Semantic segmentation assigns a label or class to each individual pixel of an image.
  Common real-world applications of semantic segmentation include:
      training self-driving cars to identify pedestrians and important traffic information,
      identifying cells and abnormalities in medical imagery,
      monitoring environmental changes from satellite imagery.
Video classification
Object detection
  This task is commonly used in autonomous driving for detecting things
    like pedestrians, road signs, and traffic lights.
  Other applications include counting objects in images, image search, and more.
Zero-shot object detection
Zero-shot image classification
Depth estimation

说明:
语义分割需要处理所有像素,目标检测只处理感兴趣的目标区域。
语义分割侧重对整个场景全面理解,目标检测侧重检测特定感兴趣目标。
MULTIMODAL
Image captioning
Document Question Answering
Text to speech
DEVELOPER GUIDES
生成文本的模型包括:
GPT2
XLNet
OpenAI GPT
CTRL
TransformerXL
XLM
Bart
T5
GIT
Whisper
Transformers Notebooks with examples
Community resources
PERFORMANCE AND SCALABILITY
Trainer supports four hyperparameter search backends currently:
optuna, sigopt, raytune and wandb
CONCEPTUAL GUIDES
Philosophy
three standard classes required to use each model:
1. configuration
2. models
3. a preprocessing class

     1) tokenizer for NLP(AutoTokenizer)
     2) image processor for vision(AutoImageProcessor)
     3) feature extractor for audio(AutoFeatureExtractor)
     4) processor for multimodal inputs(AutoProcessor)
On top of those three base classes, the library provides two APIs:
1. pipeline()
    for quickly using a model for inference on a given task
2. Trainer
    to quickly train or fine-tune a PyTorch model
Main concepts
Model classes can be PyTorch models (torch.nn.Module), Keras models (tf.keras.Model) or JAX/Flax models (flax.linen.Module) that work with the pretrained weights provided in the library.
Configuration classes store the hyperparameters required to build a model (such as the number of layers and hidden size). You don’t always need to instantiate these yourself. In particular, if you are using a pretrained model without any modification, creating the model will automatically take care of instantiating the configuration (which is part of the model).
Preprocessing classes convert the raw data into a format accepted by the model. A tokenizer stores the vocabulary for each model and provide methods for encoding and decoding strings in a list of token embedding indices to be fed to a model. Image processors preprocess vision inputs, feature extractors preprocess audio inputs, and a processor handles multimodal inputs.
All these classes have these three methods:
from_pretrained()
save_pretrained()
push_to_hub()
Glossary
attention mask
autoencoding models
autoregressive models
backbone
causal language modeling
channel
connectionist temporal classification (CTC)
convolution
decoder input IDs
decoder models
encoder models
feature extraction
feed forward chunking
finetuned models
head
image patch
inference
input IDs
labels
masked language modeling (MLM)
multimodal
pipeline
pixel values
pooling
position IDs
representation learning
self-attention
self-supervised learning
semi-supervised learning
sequence-to-sequence (seq2seq)
stride
token
token Type IDs
transfer learning
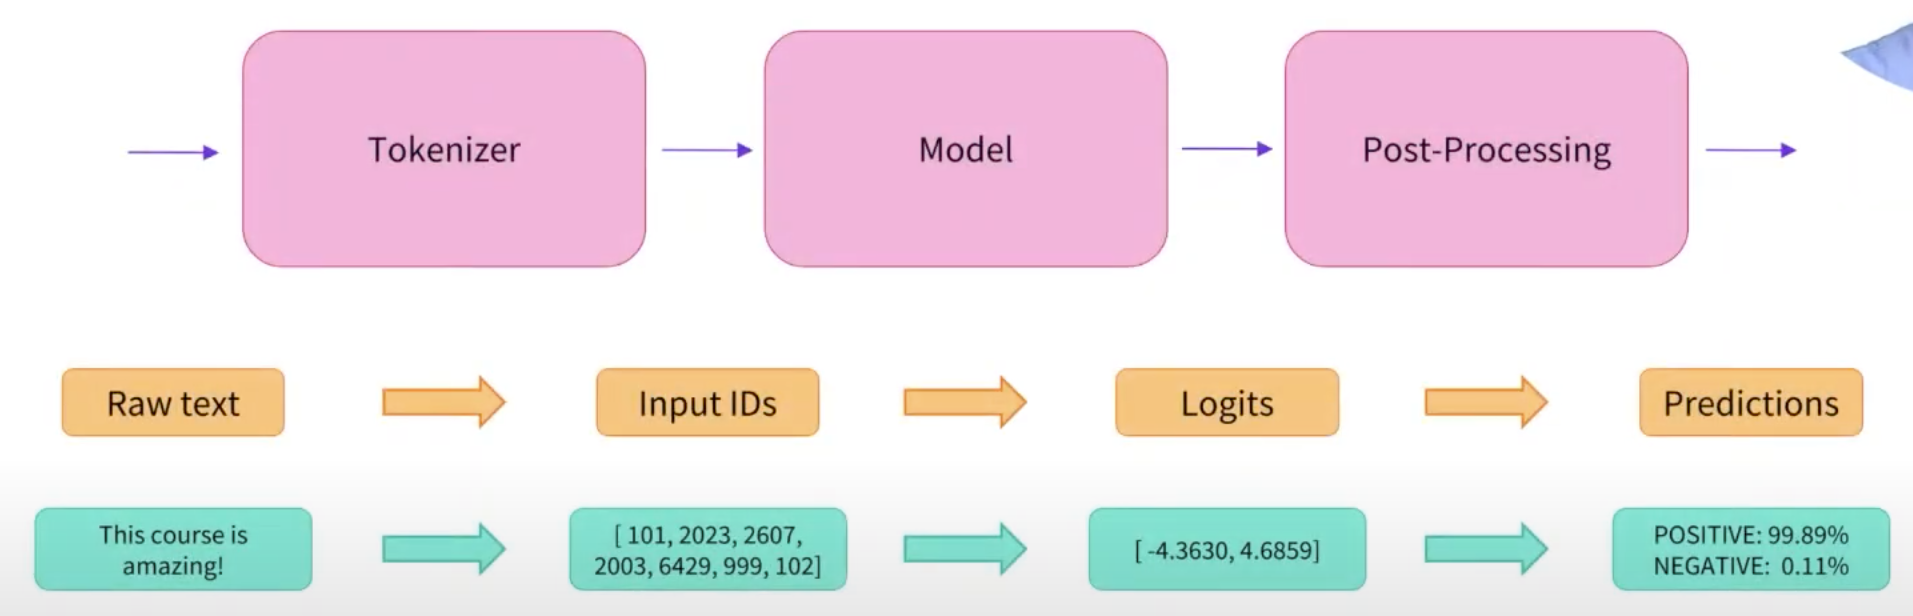
处理过程图: Tokenizer-> Model -> Post-Processing
How Transformers solve tasks
Wav2Vec2for audio classification and automatic speech recognition (ASR)Vision Transformer (ViT)andConvNeXTfor image classificationDETRfor object detectionMask2Formerfor image segmentationGLPNfor depth estimationBERTfor NLP tasks like text classification, token classification and question answering that use an encoderGPT2for NLP tasks like text generation that use a decoderBARTfor NLP tasks like summarization and translation that use an encoder-decoder
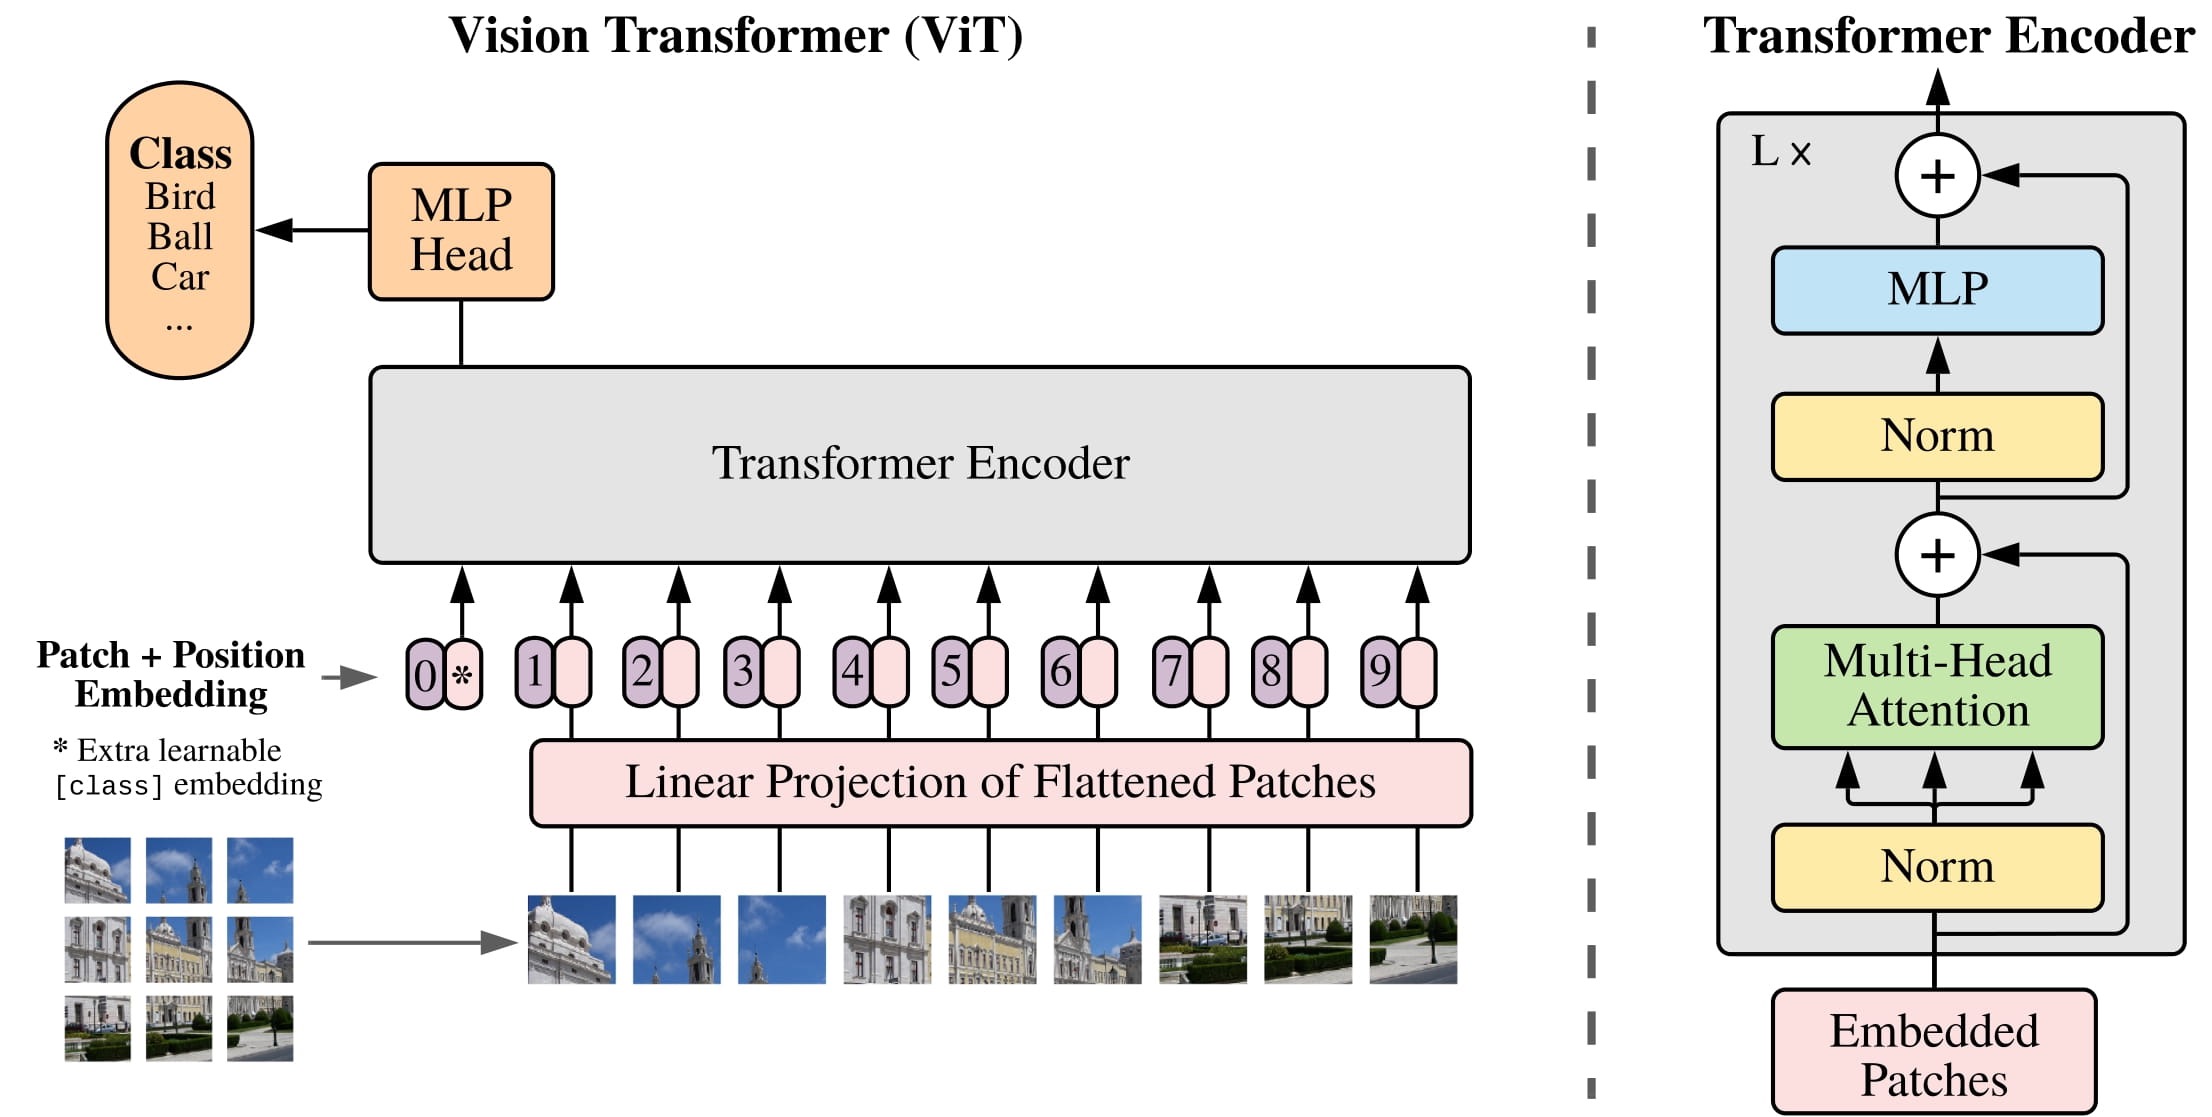
Vision Transformer
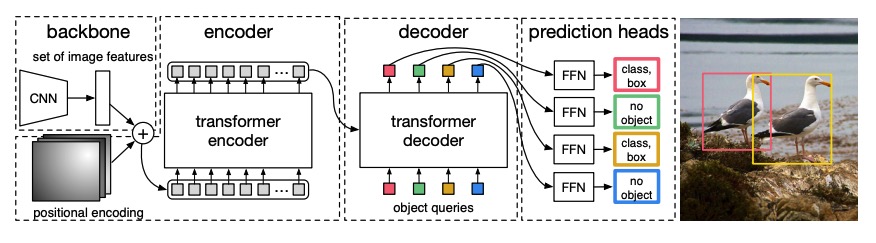
Object detection
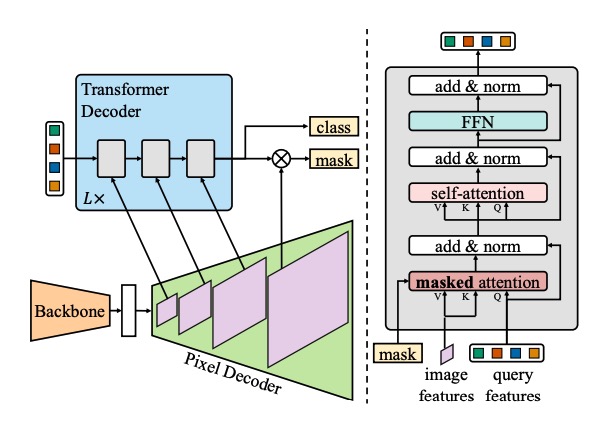
Image segmentation
Depth estimation
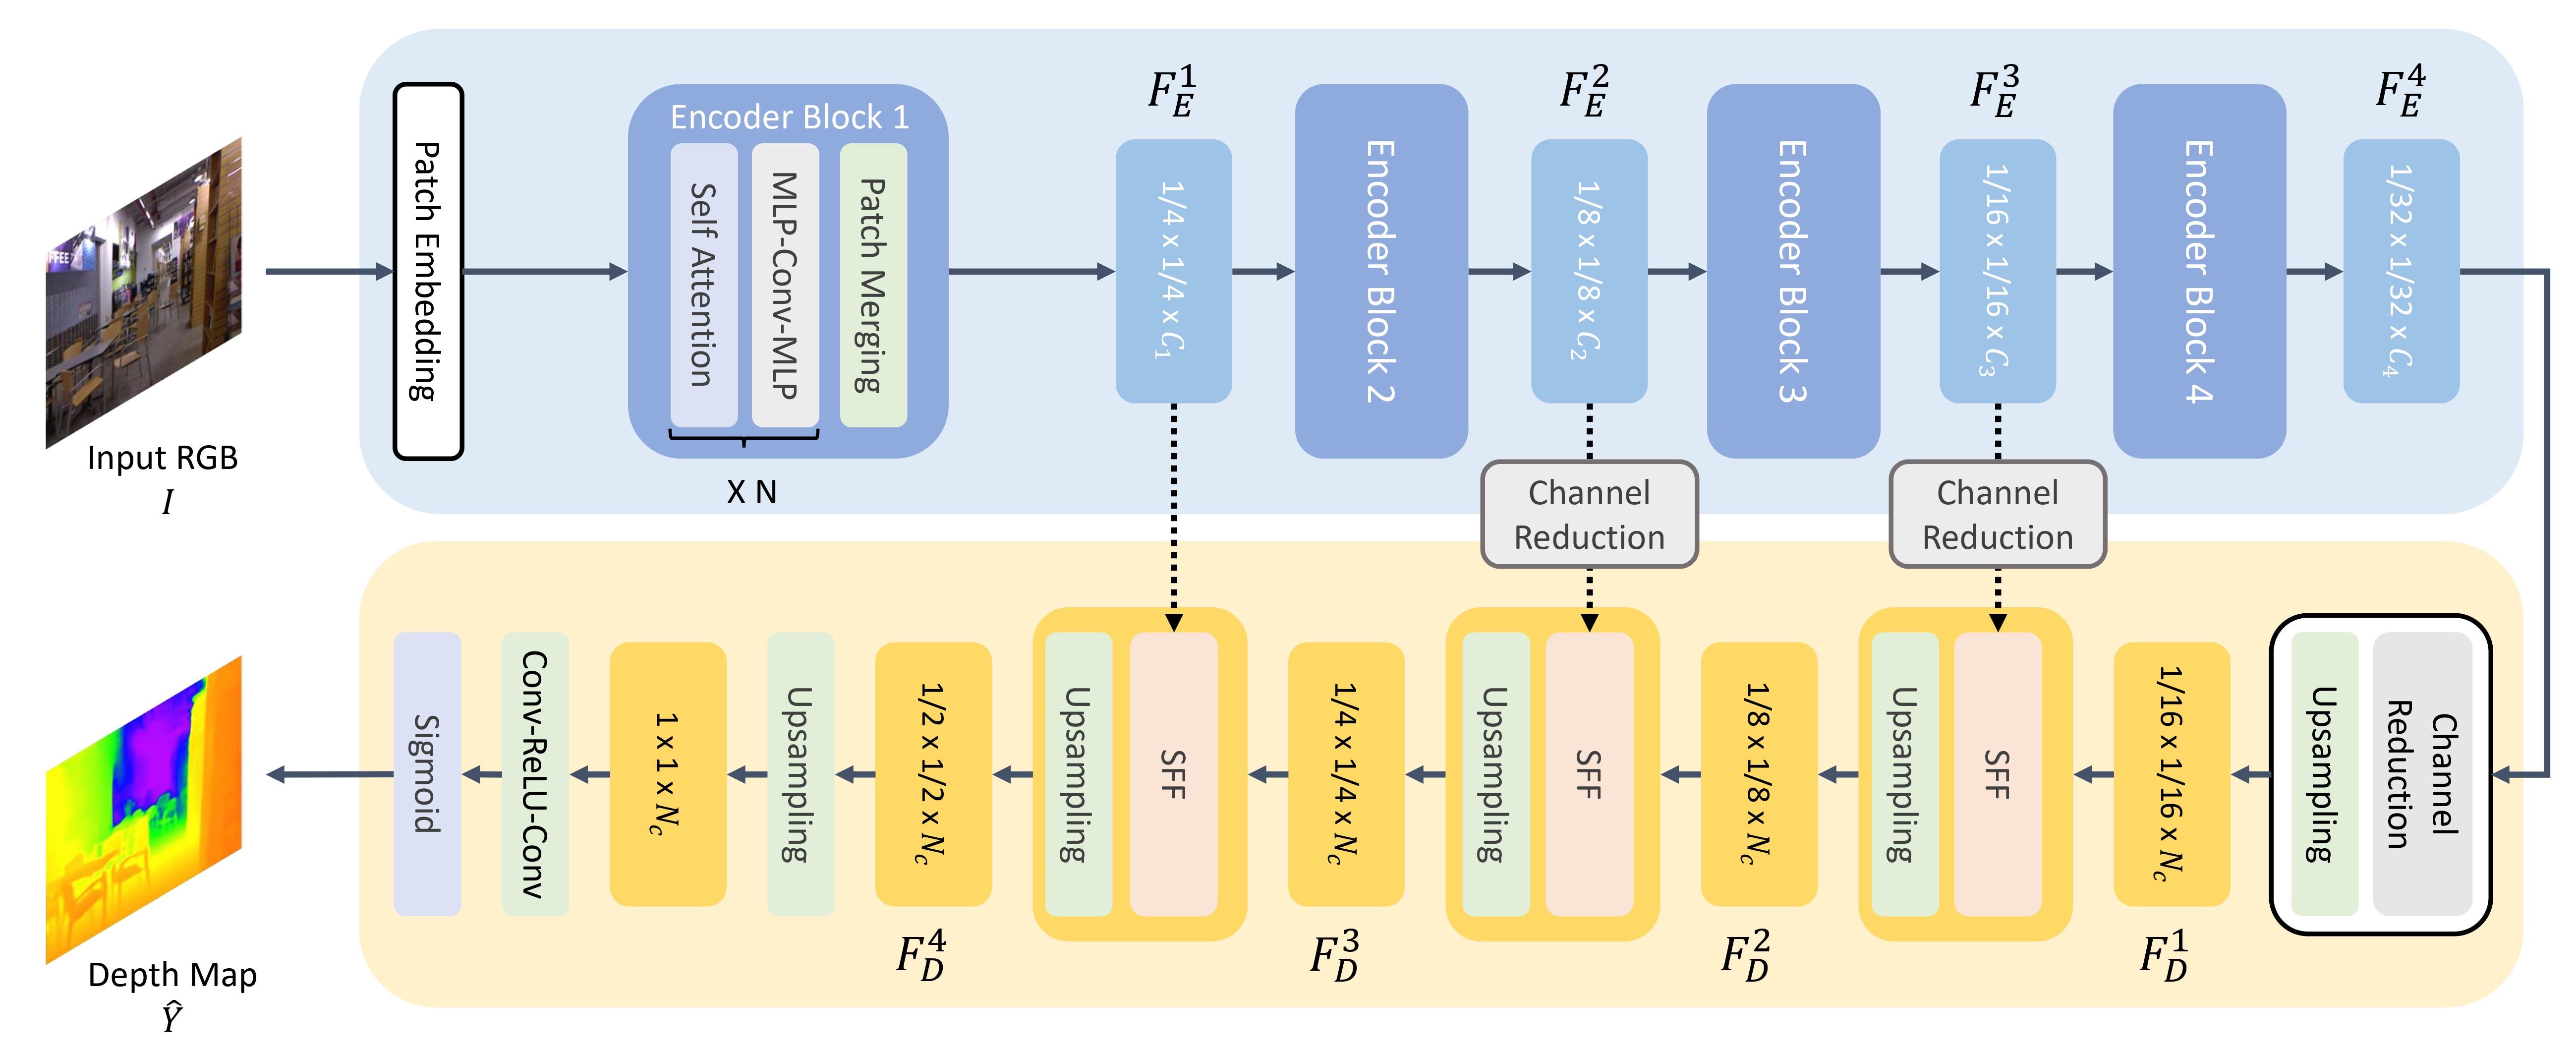
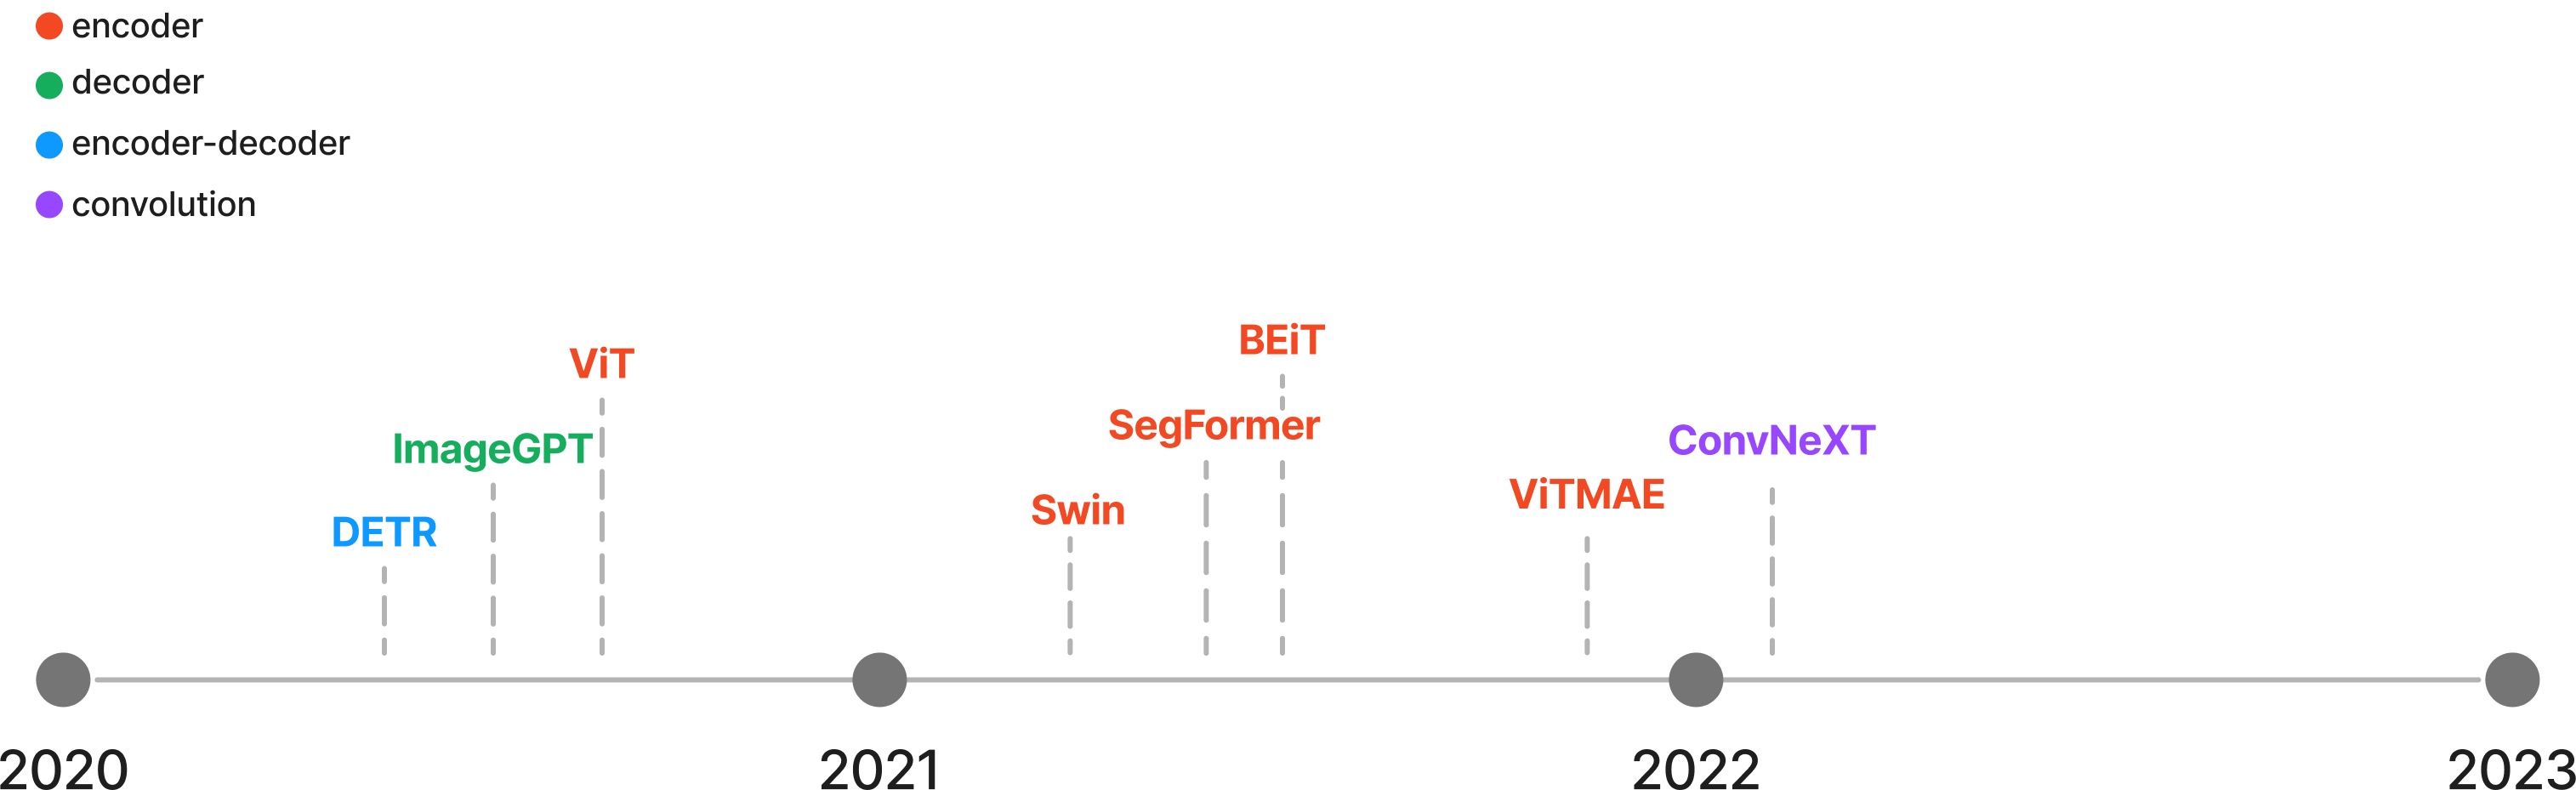
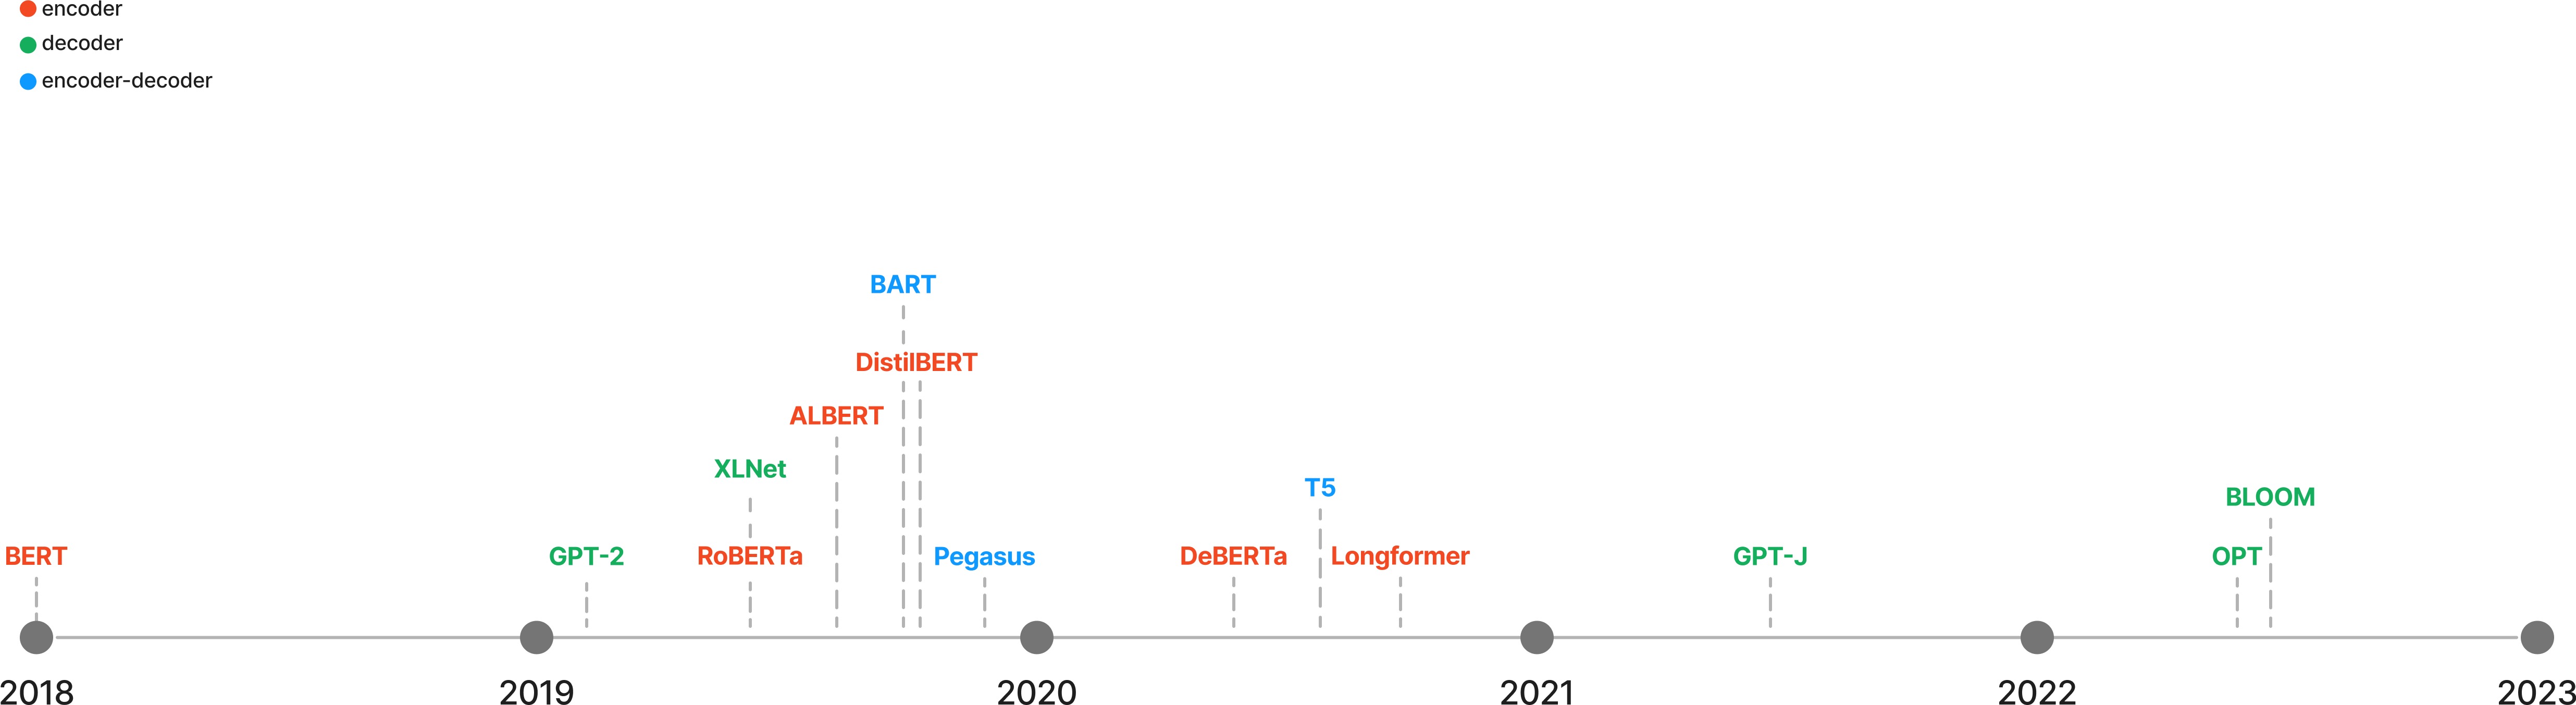
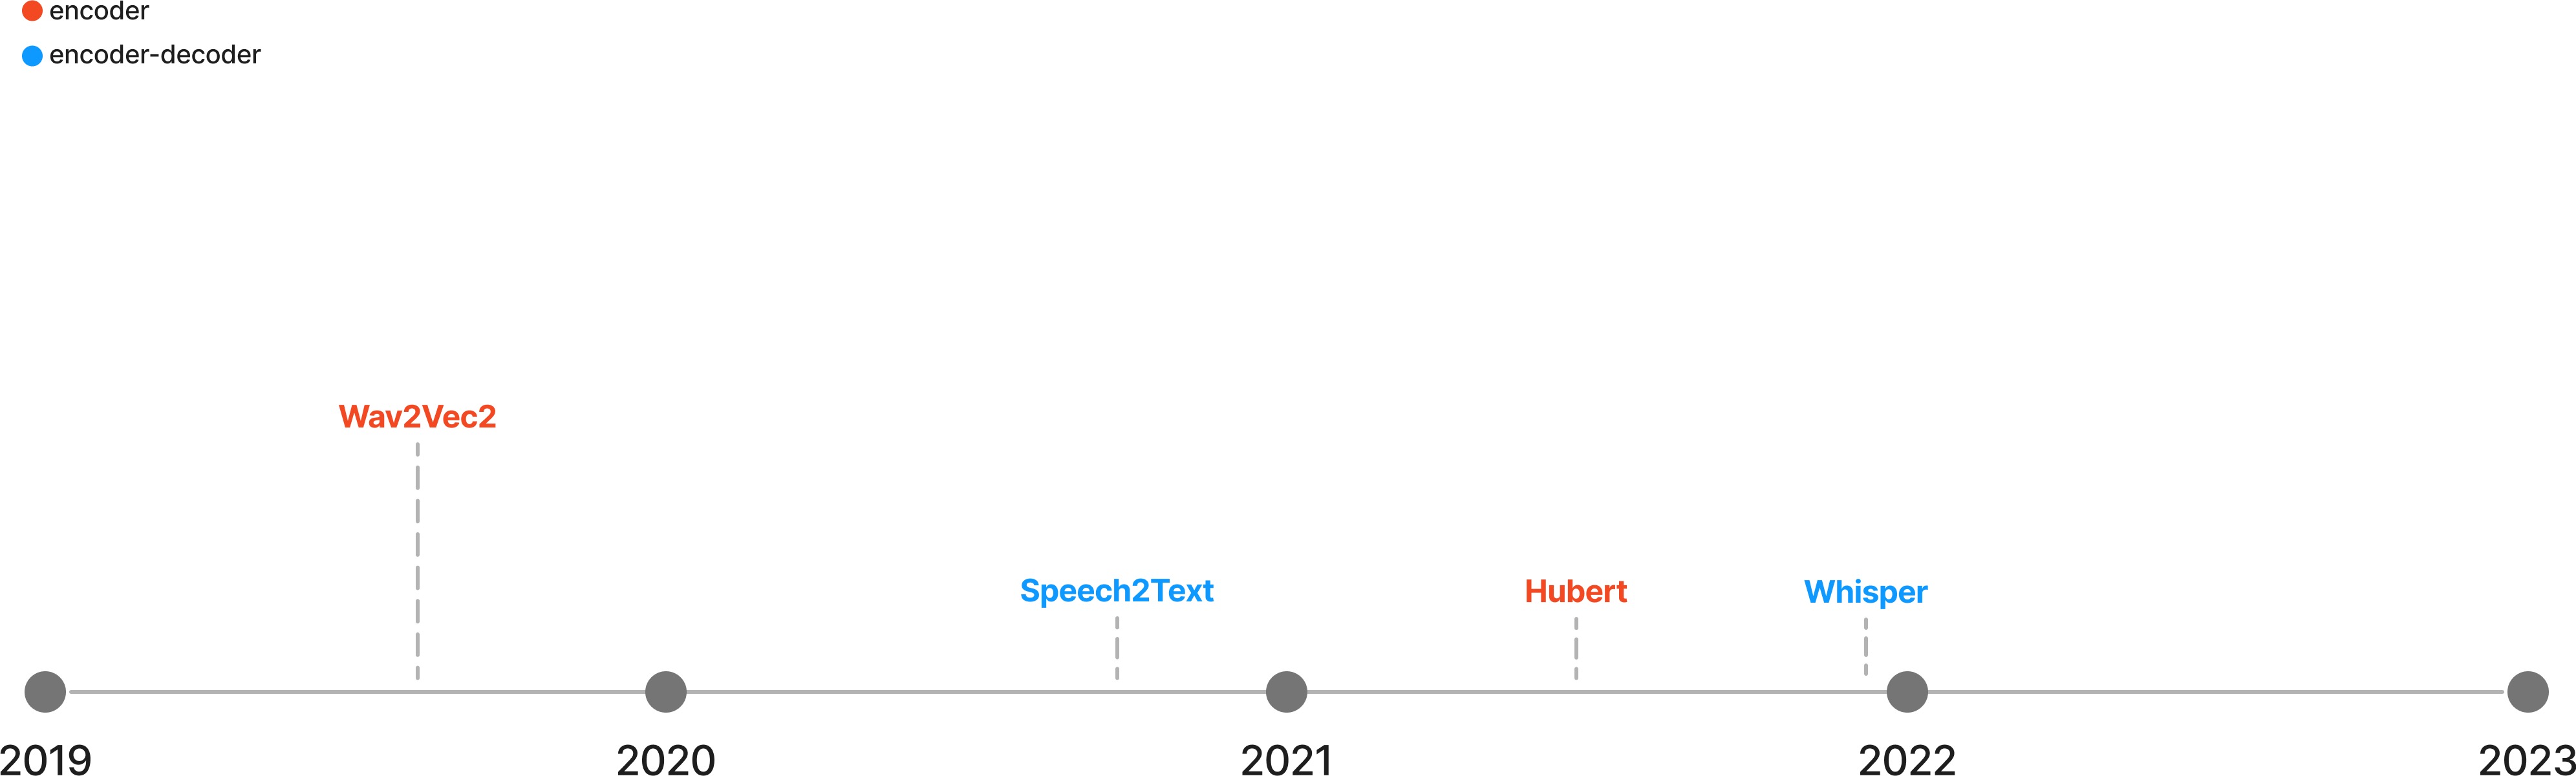
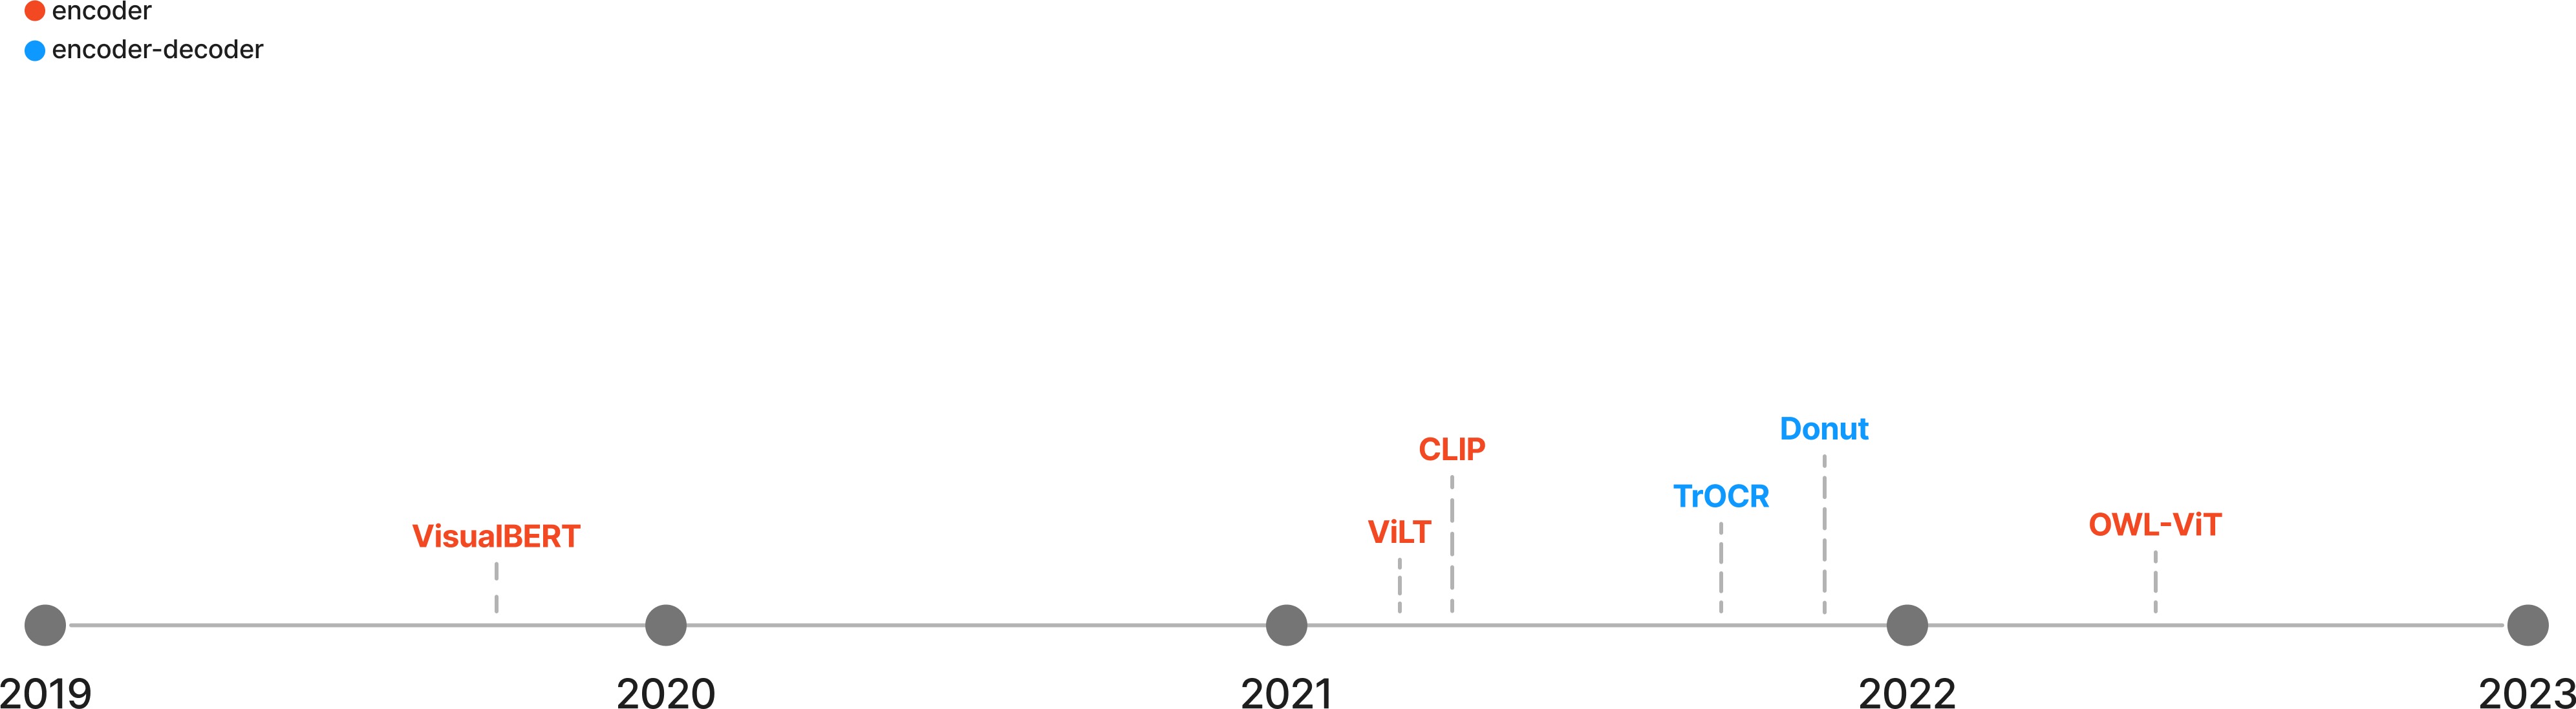
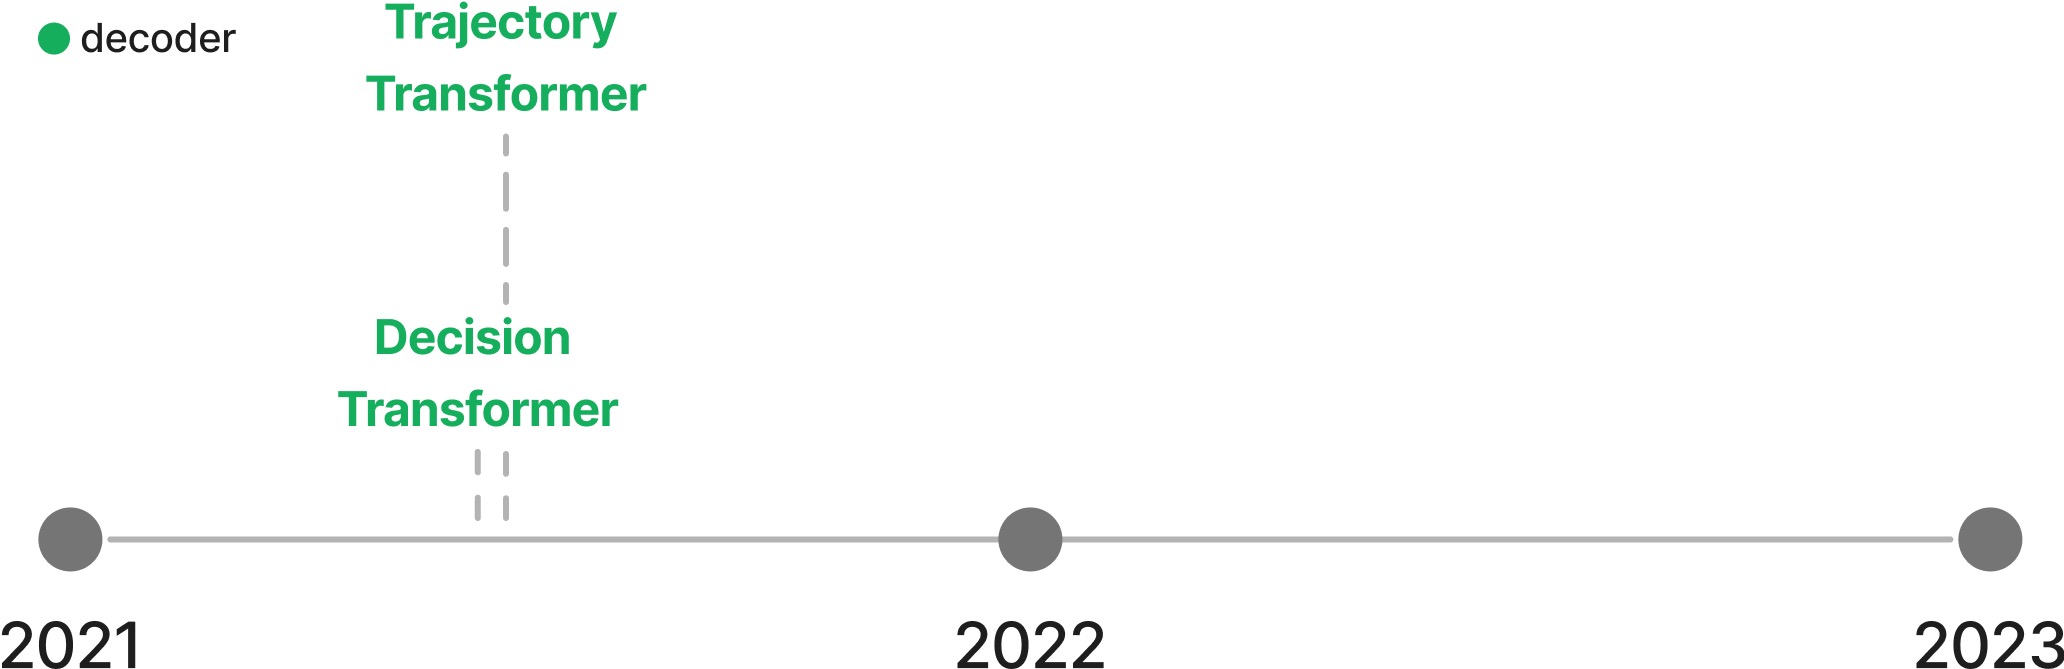
The Transformer model family
Computer vision
Natural language processing
Audio
Multimodal
Reinforcement learning
Summary of the tokenizers
3 tokenization algorithms:
1. word-based
    very large vocabularies
    large quantity of out-of-vocabulary tokens
    loss of meaning across very similar words
2. character-based
    very long sequences
    less meaningful individual tokens
3. subword-based
    principles:
        frequently used words should not be split into subwords
        rare words should be decompose into meaningful subwords
Subword tokenization:
1. Byte-Pair Encoding (BPE)
    GPT-2
    RoBERTa
2. WordPiece
    BERT
    DistilBERT
    Electra
3. Unigram+SentencePiece(适用于非空格分隔的语言)
    XLNet
    ALBERT
    Marian
    T5
API
MAIN CLASSES
Agents
three types of Agents:
1. `HfAgent` uses inference endpoints for opensource models
2. `LocalAgent` uses a model of your choice locally
3. `OpenAiAgent` uses OpenAI closed models
Auto Classes
Generic classes:
AutoConfig
AutoModel
AutoTokenizer

AutoFeatureExtractor
AutoImageProcessor
AutoProcessor
Generic pretraining classes:
AutoModelForPreTraining
Natural Language Processing:
AutoModelForCausalLM
AutoModelForMaskedLM
AutoModelForMaskGeneration
AutoModelForSeq2SeqLM
AutoModelForSequenceClassification
AutoModelForMultipleChoice
AutoModelForNextSentencePrediction
AutoModelForTokenClassification
AutoModelForQuestionAnswering
AutoModelForTextEncoding
Computer vision:
AutoModelForDepthEstimation
AutoModelForImageClassification
AutoModelForVideoClassification
AutoModelForMaskedImageModeling
AutoModelForObjectDetection
AutoModelForImageSegmentation
AutoModelForSemanticSegmentation
AutoModelForInstanceSegmentation
AutoModelForUniversalSegmentation
AutoModelForZeroShotImageClassification
AutoModelForZeroShotObjectDetection
Audio:
AutoModelForAudioClassification
AutoModelForAudioFrameClassification
AutoModelForCTC
AutoModelForSpeechSeq2Seq
AutoModelForAudioXVector
Multimodal:
AutoModelForTableQuestionAnswering
AutoModelForDocumentQuestionAnswering
AutoModelForVisualQuestionAnswering
AutoModelForVision2Seq
Callbacks
The main class that implements callbacks is TrainerCallback.
By default a Trainer will use the following callbacks:
`DefaultFlowCallback` which handles the default behavior for logging, saving and evaluation.
`PrinterCallback` or `ProgressCallback` to display progress and print the logs
    the first one is used if you deactivate tqdm through the TrainingArguments
    otherwise it’s the second one
...
Logging
日志默认Warning级别,可以调整成info级别:
import transformers
transformers.logging.set_verbosity_info()
环境变量设置:
TRANSFORMERS_VERBOSITY
Usage:
from transformers.utils import logging

logging.set_verbosity_info()
logger = logging.get_logger("transformers")
logger.info("INFO")
logger.warning("WARN")