7.4.2. vLLM官方文档
Getting Started
Quickstart
Prerequisites:
OS: Linux
Python: 3.9 – 3.12
GPU: compute capability 7.0 or higher (e.g., V100, T4, RTX20xx, A100, L4, H100, etc.)
Offline Batched Inference
from vllm import LLM, SamplingParams
prompts = [
    "Hello, my name is",
    "The president of the United States is",
    "The capital of France is",
    "The future of AI is",
]
sampling_params = SamplingParams(temperature=0.8, top_p=0.95)

llm = LLM(model="facebook/opt-125m")

outputs = llm.generate(prompts, sampling_params)

for output in outputs:
    prompt = output.prompt
    generated_text = output.outputs[0].text
    print(f"Prompt: {prompt!r}, Generated text: {generated_text!r}")
OpenAI-Compatible Server
vllm serve Qwen/Qwen2.5-1.5B-Instruct

$ curl http://localhost:8000/v1/models
OpenAI Completions API with vLLM
curl http://localhost:8000/v1/completions \
    -H "Content-Type: application/json" \
    -d '{
        "model": "Qwen/Qwen2.5-1.5B-Instruct",
        "prompt": "San Francisco is a",
        "max_tokens": 7,
        "temperature": 0
    }'
python版本:
from openai import OpenAI

# Modify OpenAI's API key and API base to use vLLM's API server.
openai_api_key = "EMPTY"
openai_api_base = "http://localhost:8000/v1"
client = OpenAI(
    api_key=openai_api_key,
    base_url=openai_api_base,
)
completion = client.completions.create(model="Qwen/Qwen2.5-1.5B-Instruct",
                                      prompt="San Francisco is a")
print("Completion result:", completion)
OpenAI Chat Completions API with vLLM
curl http://localhost:8000/v1/chat/completions \
    -H "Content-Type: application/json" \
    -d '{
        "model": "Qwen/Qwen2.5-1.5B-Instruct",
        "messages": [
            {"role": "system", "content": "You are a helpful assistant."},
            {"role": "user", "content": "Who won the world series in 2020?"}
        ]
    }'
from openai import OpenAI
# Set OpenAI's API key and API base to use vLLM's API server.
openai_api_key = "EMPTY"
openai_api_base = "http://localhost:8000/v1"

client = OpenAI(
    api_key=openai_api_key,
    base_url=openai_api_base,
)

chat_response = client.chat.completions.create(
    model="Qwen/Qwen2.5-1.5B-Instruct",
    messages=[
        {"role": "system", "content": "You are a helpful assistant."},
        {"role": "user", "content": "Tell me a joke."},
    ]
)
print("Chat response:", chat_response)
Debugging Tips
Enable more logging
export VLLM_LOGGING_LEVEL=DEBUG
export CUDA_LAUNCH_BLOCKING=1
    to identify which CUDA kernel is causing the problem.
export NCCL_DEBUG=TRACE
    to turn on more logging for NCCL.
export VLLM_TRACE_FUNCTION=1
    to record all function calls for inspection in the log files to tell which function crashes or hangs.
Serving
OpenAI Compatible Server
vllm serve NousResearch/Meta-Llama-3-8B-Instruct --dtype auto --api-key token-abc123
normal format:
{"role": "user", "content": "Hello!"}
Supported APIs
- OpenAI APIs:
Completions API (/v1/completions)
Chat Completions API (/v1/chat/completions)
Embeddings API (/v1/embeddings)
- custom APIs
Tokenizer API (/tokenize, /detokenize)
Pooling API (/pooling)
Score API (/score)
Chat Template
vllm serve <model> --chat-template ./path-to-chat-template.jinja
OpenAI spec accept a new format which specifies both a type and a text field.:
{"role": "user", "content": [{"type": "text", "text": "Classify this sentiment: vLLM is wonderful!"}]}
CLI Reference
Configuration file
config.yaml:
host: "127.0.0.1"
port: 6379
uvicorn-log-level: "info"
指定 yaml 文件:
vllm serve SOME_MODEL --config config.yaml
Deploying with Docker
Use vLLM’s Official Docker Image
docker run --runtime nvidia --gpus all \
    -v ~/.cache/huggingface:/root/.cache/huggingface \
    --env "HUGGING_FACE_HUB_TOKEN=<secret>" \
    -p 8000:8000 \
    --ipc=host \
    vllm/vllm-openai:latest \
    --model mistralai/Mistral-7B-v0.1
备注
You can either use the ipc=host flag or –shm-size flag to allow the container to access the host’s shared memory. vLLM uses PyTorch, which uses shared memory to share data between processes under the hood, particularly for tensor parallel inference.
Building vLLM’s Docker Image from Source
optionally specifies: –build-arg max_jobs=8 –build-arg nvcc_threads=2:
DOCKER_BUILDKIT=1 docker build . --target vllm-openai --tag vllm/vllm-openai
Deploying with Kubernetes
Distributed Inference and Serving
How to decide the distributed inference strategy?
Single GPU (no distributed inference): If your model fits in a single GPU, you probably don’t need to use distributed inference. Just use the single GPU to run the inference.
Single-Node Multi-GPU (tensor parallel inference): If your model is too large to fit in a single GPU, but it can fit in a single node with multiple GPUs, you can use tensor parallelism. The tensor parallel size is the number of GPUs you want to use. For example, if you have 4 GPUs in a single node, you can set the tensor parallel size to 4.
Multi-Node Multi-GPU (tensor parallel plus pipeline parallel inference): If your model is too large to fit in a single node, you can use tensor parallel together with pipeline parallelism. The tensor parallel size is the number of GPUs you want to use in each node, and the pipeline parallel size is the number of nodes you want to use. For example, if you have 16 GPUs in 2 nodes (8GPUs per node), you can set the tensor parallel size to 8 and the pipeline parallel size to 2.
Details for Distributed Inference and Serving
run API server on 4 GPUs:
vllm serve facebook/opt-13b --tensor-parallel-size 4
run API server on 8 GPUs with pipeline parallelism and tensor parallelism:
vllm serve gpt2 \
    --tensor-parallel-size 4 \
    --pipeline-parallel-size 2
Multi-Node Inference and Serving
备注
It is important to make sure the execution environment is the same on all nodes, including the model path, the Python environment. The recommended way is to use docker images to ensure the same environment, and hide the heterogeneity of the host machines via mapping them into the same docker configuration.
备注
Administrative privileges are needed when to access GPU performance counters when running profiling and tracing tools.
Pick a node as the head node, and run the following command:
bash run_cluster.sh \
                  vllm/vllm-openai \
                  <ip_of_head_node> \
                  --head \
                  /path/to/the/huggingface/home/in/this/node
On the rest of the worker nodes, run the following command:
bash run_cluster.sh \
                  vllm/vllm-openai \
                  <ip_of_head_node> \
                  --worker \
                  /path/to/the/huggingface/home/in/this/node
进入容器:
docker exec -it node /bin/bash
像在一个node上一样执行(set the tensor parallel size to the number of GPUs in each node, and the pipeline parallel size to the number of nodes):
vllm serve /path/to/the/model/in/the/container \
    --tensor-parallel-size 8 \
    --pipeline-parallel-size 2
Production Metrics
get the latest metrics from the server:
$ curl http://0.0.0.0:8000/metrics
vllm:iteration_tokens_total_sum{model_name="unsloth/Llama-3.2-1B-Instruct"} 0.0
vllm:iteration_tokens_total_bucket{le="1.0",model_name="unsloth/Llama-3.2-1B-Instruct"} 3.0
...
Models
Loading a Model
HuggingFace Hub
default
The easiest way to check if your model is really supported at runtime:
from vllm import LLM

# For generative models (task=generate) only
llm = LLM(model=..., task="generate")  # Name or path of your model
output = llm.generate("Hello, my name is")
print(output)

# For pooling models (task={embed,classify,reward,score}) only
llm = LLM(model=..., task="embed")  # Name or path of your model
output = llm.encode("Hello, my name is")
print(output)
If vLLM successfully returns text (for generative models) or hidden states (for pooling models), it indicates that your model is supported.
ModelScope
环境变量:
$ export VLLM_USE_MODELSCOPE=True
And use with trust_remote_code=True:
from vllm import LLM

llm = LLM(model=..., revision=..., task=..., trust_remote_code=True)

# For generative models (task=generate) only
output = llm.generate("Hello, my name is")
print(output)

# For pooling models (task={embed,classify,reward,score}) only
output = llm.encode("Hello, my name is")
print(output)
List of Models
当前支持的模型(文本模型、多模态模型)
Generative Models
Offline Inference
LLM.generate
基本:
llm = LLM(model="facebook/opt-125m")
outputs = llm.generate("Hello, my name is")

for output in outputs:
    prompt = output.prompt
    generated_text = output.outputs[0].text
    print(f"Prompt: {prompt!r}, Generated text: {generated_text!r}")
use greedy sampling by setting temperature=0:
llm = LLM(model="facebook/opt-125m")
params = SamplingParams(temperature=0)
outputs = llm.generate("Hello, my name is", params)

for output in outputs:
    prompt = output.prompt
    generated_text = output.outputs[0].text
    print(f"Prompt: {prompt!r}, Generated text: {generated_text!r}")
LLM.beam_search
search using 5 beams and output at most 50 tokens:
llm = LLM(model="facebook/opt-125m")
params = BeamSearchParams(beam_width=5, max_tokens=50)
outputs = llm.generate("Hello, my name is", params)

for output in outputs:
    prompt = output.prompt
    generated_text = output.outputs[0].text
    print(f"Prompt: {prompt!r}, Generated text: {generated_text!r}")
LLM.chat
备注
In general, only instruction-tuned models have a chat template. Base models may perform poorly as they are not trained to respond to the chat conversation.
llm = LLM(model="meta-llama/Meta-Llama-3-8B-Instruct")
conversation = [
    {
        "role": "system",
        "content": "You are a helpful assistant"
    },
    {
        "role": "user",
        "content": "Hello"
    },
    {
        "role": "assistant",
        "content": "Hello! How can I assist you today?"
    },
    {
        "role": "user",
        "content": "Write an essay about the importance of higher education.",
    },
]
outputs = llm.chat(conversation)

for output in outputs:
    prompt = output.prompt
    generated_text = output.outputs[0].text
    print(f"Prompt: {prompt!r}, Generated text: {generated_text!r}")
If the model doesn’t have a chat template or you want to specify another one, you can explicitly pass a chat template:
from vllm.entrypoints.chat_utils import load_chat_template

# You can find a list of existing chat templates under `examples/`
custom_template = load_chat_template(chat_template="<path_to_template>")
print("Loaded chat template:", custom_template)

outputs = llm.chat(conversation, chat_template=custom_template)
Online Inference
vllm serve <model>
Pooling Models
LLM.encode:
llm = LLM(model="Qwen/Qwen2.5-Math-RM-72B", task="reward")
(output,) = llm.encode("Hello, my name is")

data = output.outputs.data
print(f"Data: {data!r}")
LLM.embed:
llm = LLM(model="intfloat/e5-mistral-7b-instruct", task="embed")
(output,) = llm.embed("Hello, my name is")

embeds = output.outputs.embedding
print(f"Embeddings: {embeds!r} (size={len(embeds)})")
LLM.classify:
llm = LLM(model="jason9693/Qwen2.5-1.5B-apeach", task="classify")
(output,) = llm.classify("Hello, my name is")

probs = output.outputs.probs
print(f"Class Probabilities: {probs!r} (size={len(probs)})")
LLM.score:
llm = LLM(model="BAAI/bge-reranker-v2-m3", task="score")
(output,) = llm.score("What is the capital of France?",
                      "The capital of Brazil is Brasilia.")

score = output.outputs.score
print(f"Score: {score}")
Adding a New Model
指定如何自己适配一个新的模型
Enabling Multimodal Inputs
vllm 默认不支持多模态,需要按本节完成配置
https://docs.vllm.ai/en/stable/models/enabling_multimodal_inputs.html
Usage
LoRA Adapters
instantiate the base model and pass in the enable_lora=True flag:
from vllm import LLM, SamplingParams
from vllm.lora.request import LoRARequest

llm = LLM(model="meta-llama/Llama-2-7b-hf", enable_lora=True)
submit the prompts and call llm.generate with the lora_request parameter:
from huggingface_hub import snapshot_download
sql_lora_path = snapshot_download(repo_id="yard1/llama-2-7b-sql-lora-test")

sampling_params = SamplingParams(
    temperature=0,
    max_tokens=256,
    stop=["[/assistant]"]
)

prompts = [
     "[user] Write a SQL query to answer the question based on the table schema.\n\n context: CREATE TABLE table_name_74 (icao VARCHAR, airport VARCHAR)\n\n question: Name the ICAO for lilongwe international airport [/user] [assistant]",
     "[user] Write a SQL query to answer the question based on the table schema.\n\n context: CREATE TABLE table_name_11 (nationality VARCHAR, elector VARCHAR)\n\n question: When Anchero Pantaleone was the elector what is under nationality? [/user] [assistant]",
]

# LoRARequest 参数
#   1. a human identifiable name
#   2. a globally unique ID
#   3. path to the LoRA adapter
outputs = llm.generate(
    prompts,
    sampling_params,
    lora_request=LoRARequest("sql_adapter", 1, sql_lora_path)
)
Serving LoRA Adapters
specify each LoRA module when we kickoff the server:
vllm serve meta-llama/Llama-2-7b-hf \
    --enable-lora \
    --lora-modules sql-lora=$HOME/.cache/huggingface/hub/models--yard1--llama-2-7b-sql-lora-test/snapshots/0dfa347e8877a4d4ed19ee56c140fa518470028c/
请求:
curl http://localhost:8000/v1/completions \
    -H "Content-Type: application/json" \
    -d '{
        "model": "sql-lora",
        "prompt": "San Francisco is a",
        "max_tokens": 7,
        "temperature": 0
    }' | jq
Dynamically serving LoRA Adapters
警告
Note: Enabling this feature in production environments is risky as user may participate model adapter management.
To enable dynamic LoRA loading and unloading:
export VLLM_ALLOW_RUNTIME_LORA_UPDATING=True
request to load a LoRA adapter:
curl -X POST http://localhost:8000/v1/load_lora_adapter \
-H "Content-Type: application/json" \
-d '{
    "lora_name": "sql_adapter",
    "lora_path": "/path/to/sql-lora-adapter"
}'
request to unload a LoRA adapter:
curl -X POST http://localhost:8000/v1/unload_lora_adapter \
-H "Content-Type: application/json" \
-d '{
    "lora_name": "sql_adapter"
}'
New format for –lora-modules
provide LoRA modules via key-value pair:
--lora-modules sql-lora=$HOME/.cache/huggingface/hub/models--yard1--llama-2-7b-sql-lora-test/snapshots/0dfa347e8877a4d4ed19ee56c140fa518470028c/
specify a base_model_name alongside the name and path using JSON format:
--lora-modules '{"name": "sql-lora", "path": "/path/to/lora", "base_model_name": "meta-llama/Llama-2-7b"}'
Lora model lineage in model card
curl http://localhost:8000/v1/models
{
    "object": "list",
    "data": [
        {
        "id": "meta-llama/Llama-2-7b-hf",
        "object": "model",
        "created": 1715644056,
        "owned_by": "vllm",
        "root": "~/.cache/huggingface/hub/models--meta-llama--Llama-2-7b-hf/snapshots/01c7f73d771dfac7d292323805ebc428287df4f9/",
        "parent": null,
        "permission": [
            {
            .....
            }
        ]
        },
        {
        "id": "sql-lora",
        "object": "model",
        "created": 1715644056,
        "owned_by": "vllm",
        "root": "~/.cache/huggingface/hub/models--yard1--llama-2-7b-sql-lora-test/snapshots/0dfa347e8877a4d4ed19ee56c140fa518470028c/",
        "parent": meta-llama/Llama-2-7b-hf,
        "permission": [
            {
            ....
            }
        ]
        }
    ]
}
Multimodal Inputs
Image
llm = LLM(model="llava-hf/llava-1.5-7b-hf")

# Refer to the HuggingFace repo for the correct format to use
prompt = "USER: <image>\nWhat is the content of this image?\nASSISTANT:"

# Load the image using PIL.Image
image = PIL.Image.open(...)

# Single prompt inference
outputs = llm.generate({
    "prompt": prompt,
    "multi_modal_data": {"image": image},
})

for o in outputs:
    generated_text = o.outputs[0].text
    print(generated_text)

# Batch inference
image_1 = PIL.Image.open(...)
image_2 = PIL.Image.open(...)
outputs = llm.generate(
    [
        {
            "prompt": "USER: <image>\nWhat is the content of this image?\nASSISTANT:",
            "multi_modal_data": {"image": image_1},
        },
        {
            "prompt": "USER: <image>\nWhat's the color of this image?\nASSISTANT:",
            "multi_modal_data": {"image": image_2},
        }
    ]
)

for o in outputs:
    generated_text = o.outputs[0].text
    print(generated_text)
multiple images:
llm = LLM(
    model="microsoft/Phi-3.5-vision-instruct",
    trust_remote_code=True,  # Required to load Phi-3.5-vision
    max_model_len=4096,  # Otherwise, it may not fit in smaller GPUs
    limit_mm_per_prompt={"image": 2},  # The maximum number to accept
)

# Refer to the HuggingFace repo for the correct format to use
prompt = "<|user|>\n<|image_1|>\n<|image_2|>\nWhat is the content of each image?<|end|>\n<|assistant|>\n"

# Load the images using PIL.Image
image1 = PIL.Image.open(...)
image2 = PIL.Image.open(...)

outputs = llm.generate({
    "prompt": prompt,
    "multi_modal_data": {
        "image": [image1, image2]
    },
})

for o in outputs:
    generated_text = o.outputs[0].text
    print(generated_text)
Multi-image input can be extended to perform video captioning:
# Specify the maximum number of frames per video to be 4. This can be changed.
llm = LLM("Qwen/Qwen2-VL-2B-Instruct", limit_mm_per_prompt={"image": 4})

# Create the request payload.
video_frames = ... # load your video making sure it only has the number of frames specified earlier.
message = {
    "role": "user",
    "content": [
        {"type": "text", "text": "Describe this set of frames. Consider the frames to be a part of the same video."},
    ],
}
for i in range(len(video_frames)):
    base64_image = encode_image(video_frames[i]) # base64 encoding.
    new_image = {"type": "image_url", "image_url": {"url": f"data:image/jpeg;base64,{base64_image}"}}
    message["content"].append(new_image)

# Perform inference and log output.
outputs = llm.chat([message])

for o in outputs:
    generated_text = o.outputs[0].text
    print(generated_text)
Video
examples/offline_inference_vision_language.py
Audio
examples/offline_inference_audio_language.py
Tool Calling
Quickstart
use the llama3 tool calling chat template:
vllm serve meta-llama/Llama-3.1-8B-Instruct \
    --enable-auto-tool-choice \
    --tool-call-parser llama3_json \
    --chat-template examples/tool_chat_template_llama3_json.jinja
request to the model:
from openai import OpenAI
import json

client = OpenAI(base_url="http://localhost:8000/v1", api_key="dummy")

def get_weather(location: str, unit: str):
    return f"Getting the weather for {location} in {unit}..."
tool_functions = {"get_weather": get_weather}

tools = [{
    "type": "function",
    "function": {
        "name": "get_weather",
        "description": "Get the current weather in a given location",
        "parameters": {
            "type": "object",
            "properties": {
                "location": {"type": "string", "description": "City and state, e.g., 'San Francisco, CA'"},
                "unit": {"type": "string", "enum": ["celsius", "fahrenheit"]}
            },
            "required": ["location", "unit"]
        }
    }
}]

response = client.chat.completions.create(
    model=client.models.list().data[0].id,
    messages=[{"role": "user", "content": "What's the weather like in San Francisco?"}],
    tools=tools,
    tool_choice="auto"
)

tool_call = response.choices[0].message.tool_calls[0].function
print(f"Function called: {tool_call.name}")
print(f"Arguments: {tool_call.arguments}")
print(f"Result: {get_weather(**json.loads(tool_call.arguments))}")
输出:
Function called: get_weather
Arguments: {"location": "San Francisco, CA", "unit": "fahrenheit"}
Result: Getting the weather for San Francisco, CA in fahrenheit...
Structured Outputs
vLLM 支持使用 outline 或 lm-format-enforcer 作为引导式解码的后端来生成结构化输出
Speculative decoding
警告
请注意,vLLM 中的推测解码尚未优化,通常不会减少所有提示数据集或采样参数的令牌间延迟。优化工作参见 这儿
Performance and Tuning
KV 缓存空间不足以处理所有批处理请求。vLLM 可以抢占请求,为其他请求释放 KV 缓存空间。
当足够的 KV 缓存空间再次可用时,将重新计算被抢占的请求。发生这种情况时,将打印以下警告:
WARNING 05-09 00:49:33 scheduler.py:1057 Sequence group 0 is preempted by PreemptionMode.SWAP mode because there is not enough KV cache space.
This can affect the end-to-end performance.
Increase gpu_memory_utilization or tensor_parallel_size to provide more KV cache memory. total_cumulative_preemption_cnt=1
Environment Variables
vLLM 使用的所有环境变量都以
VLLM_为前缀
Usage Stats Collection
预览收集的数据:
tail ~/.config/vllm/usage_stats.json
可以通过设置 VLLM_NO_USAGE_STATS 或 DO_NOT_TRACK 环境变量,或者通过创建 ~/.config/vllm/do_not_track 文件来选择退出使用情况统计信息收集:
# Any of the following methods can disable usage stats collection
export VLLM_NO_USAGE_STATS=1
export DO_NOT_TRACK=1
mkdir -p ~/.config/vllm && touch ~/.config/vllm/do_not_track
Design
Architecture Overview
Entrypoints
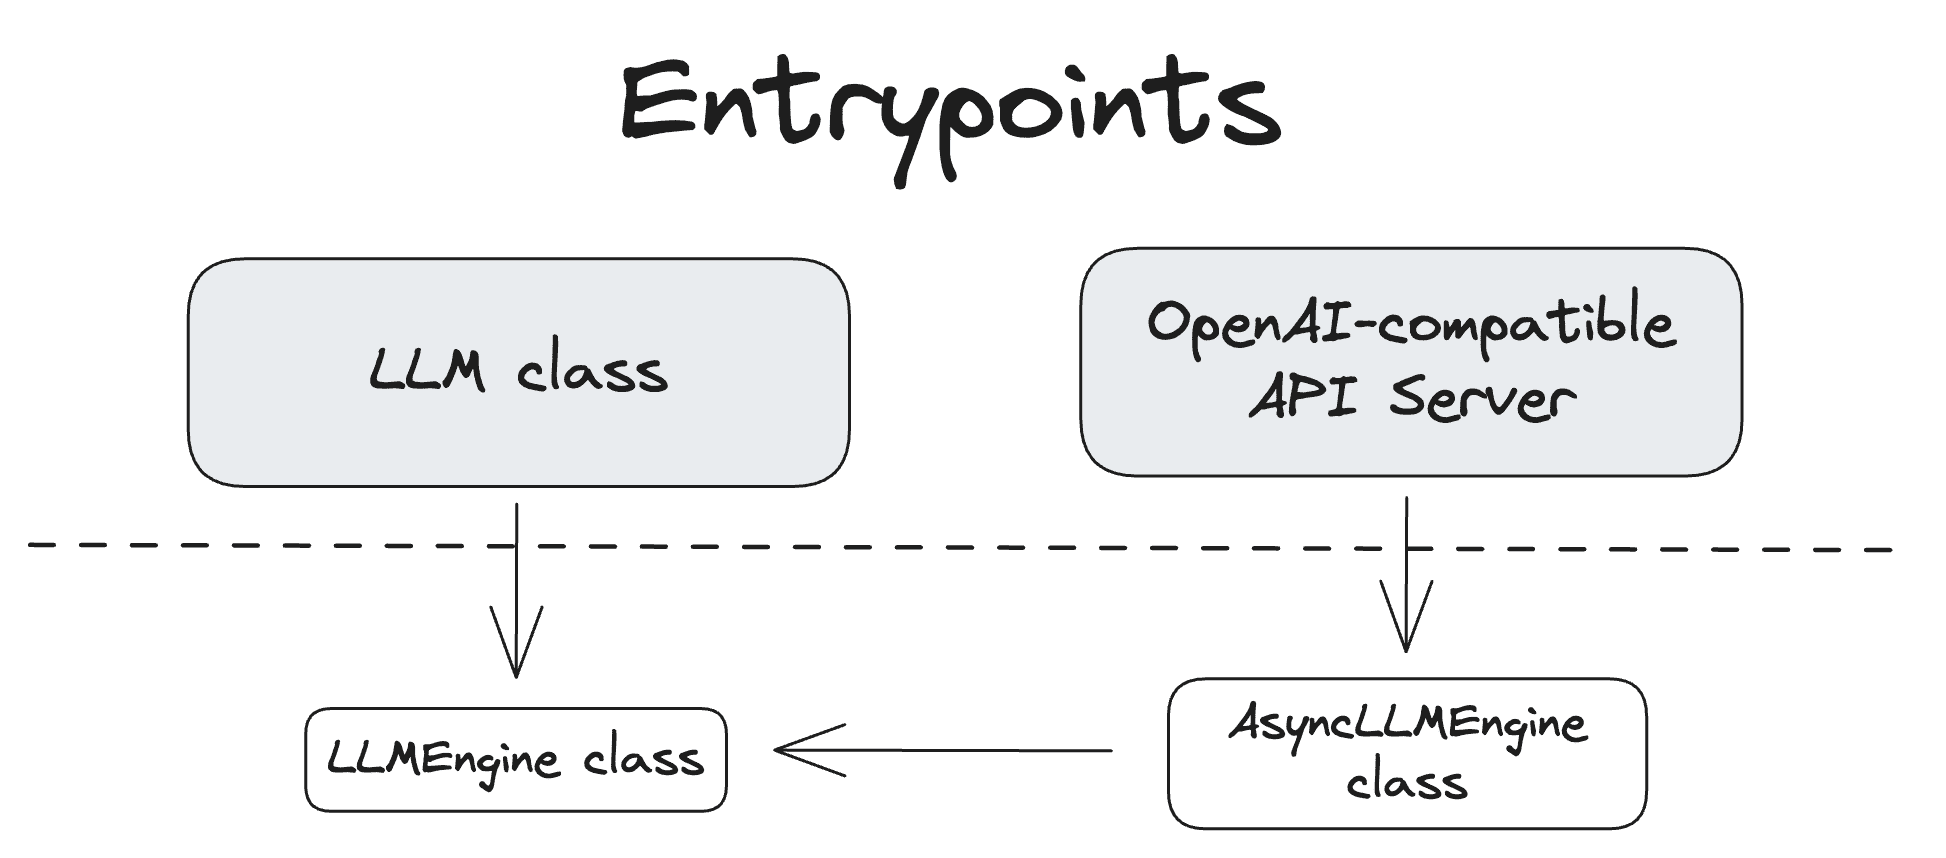
entrypoints for interacting with the system.
LLM Class
the primary Python interface for doing offline inference
from vllm import LLM, SamplingParams

# Define a list of input prompts
prompts = [
    "Hello, my name is",
    "The capital of France is",
    "The largest ocean is",
]

# Define sampling parameters
sampling_params = SamplingParams(temperature=0.8, top_p=0.95)

# Initialize the LLM engine with the OPT-125M model
llm = LLM(model="facebook/opt-125m")

# Generate outputs for the input prompts
outputs = llm.generate(prompts, sampling_params)

# Print the generated outputs
for output in outputs:
    prompt = output.prompt
    generated_text = output.outputs[0].text
    print(f"Prompt: {prompt!r}, Generated text: {generated_text!r}")
OpenAI-compatible API server
The second primary interface to vLLM is via its OpenAI-compatible API server:
# 1. started using the vllm serve command.
vllm serve <model>

# 2. used directly
python -m vllm.entrypoints.openai.api_server --model <model>
LLM Engine
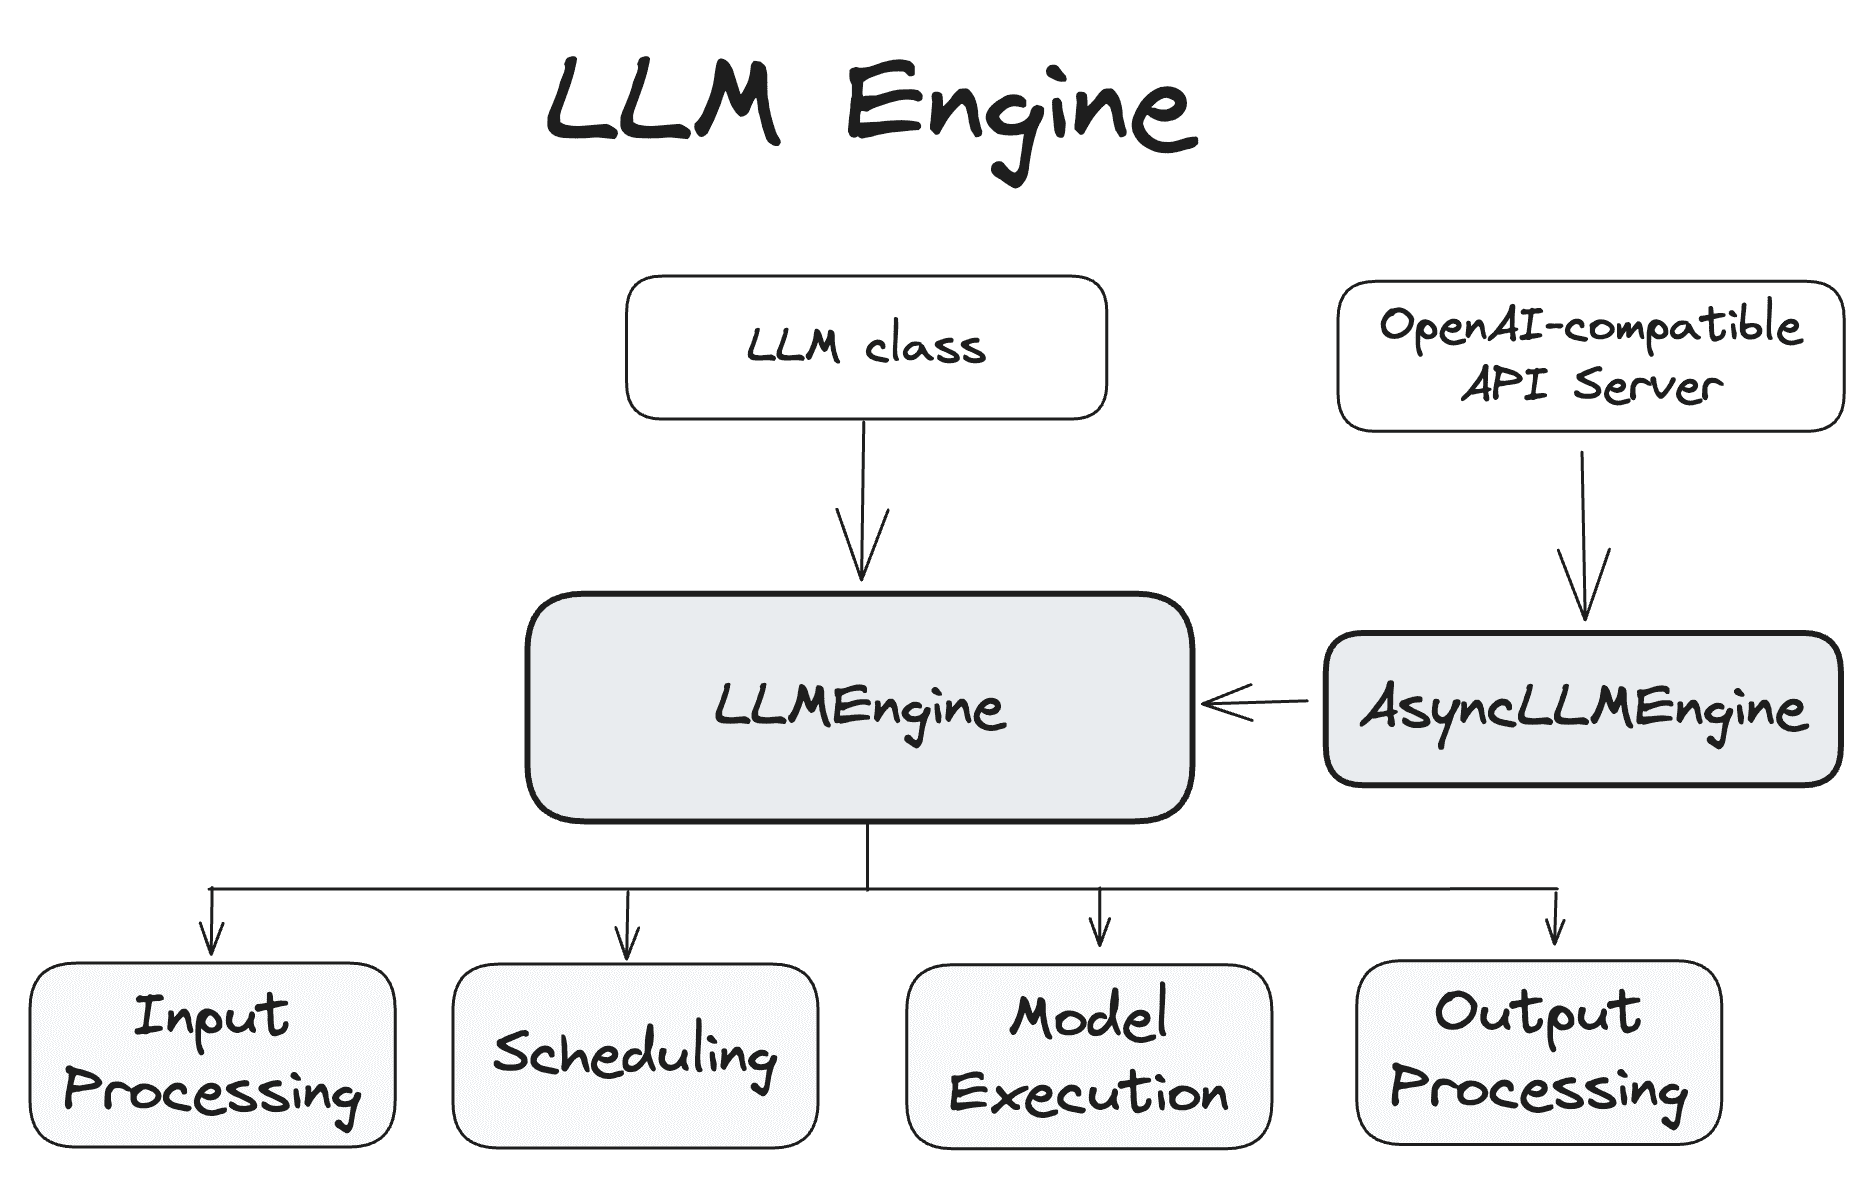
The LLMEngine and AsyncLLMEngine classes are central to the functioning of the vLLM system, handling model inference and asynchronous request processing.
LLMEngine
The LLMEngine class is the core component of the vLLM engine.
It is responsible for receiving requests from clients and generating outputs from the model.
The LLMEngine includes input processing, model execution (possibly distributed across multiple hosts and/or GPUs), scheduling, and output processing
- 主要功能
Input Processing: Handles tokenization of input text using the specified tokenizer.
Scheduling: Chooses which requests are processed in each step.
Model Execution: Manages the execution of the language model, including distributed execution across multiple GPUs.
Output Processing: Processes the outputs generated by the model, decoding the token IDs from a language model into human-readable text.
AsyncLLMEngine
The AsyncLLMEngine class is an asynchronous wrapper for the LLMEngine class.
It uses asyncio to create a background loop that continuously processes incoming requests.
The AsyncLLMEngine is designed for online serving, where it can handle multiple concurrent requests and stream outputs to clients.
Worker
A worker is a process that runs the model inference.
vLLM follows the common practice of using one process to control one accelerator device, such as GPUs.
For example, if we use tensor parallelism of size 2 and pipeline parallelism of size 2, we will have 4 workers in total.
Workers are identified by their
rankandlocal_rank.rankis used for global orchestration, whilelocal_rankis mainly used for assigning the accelerator device and accessing local resources such as the file system and shared memory.
Model Runner
Every worker has one model runner object, responsible for loading and running the model.
Much of the model execution logic resides here, such as preparing input tensors and capturing cudagraphs.
Model
Every model runner object has one model object, which is the actual
torch.nn.Moduleinstance.
Class Hierarchy
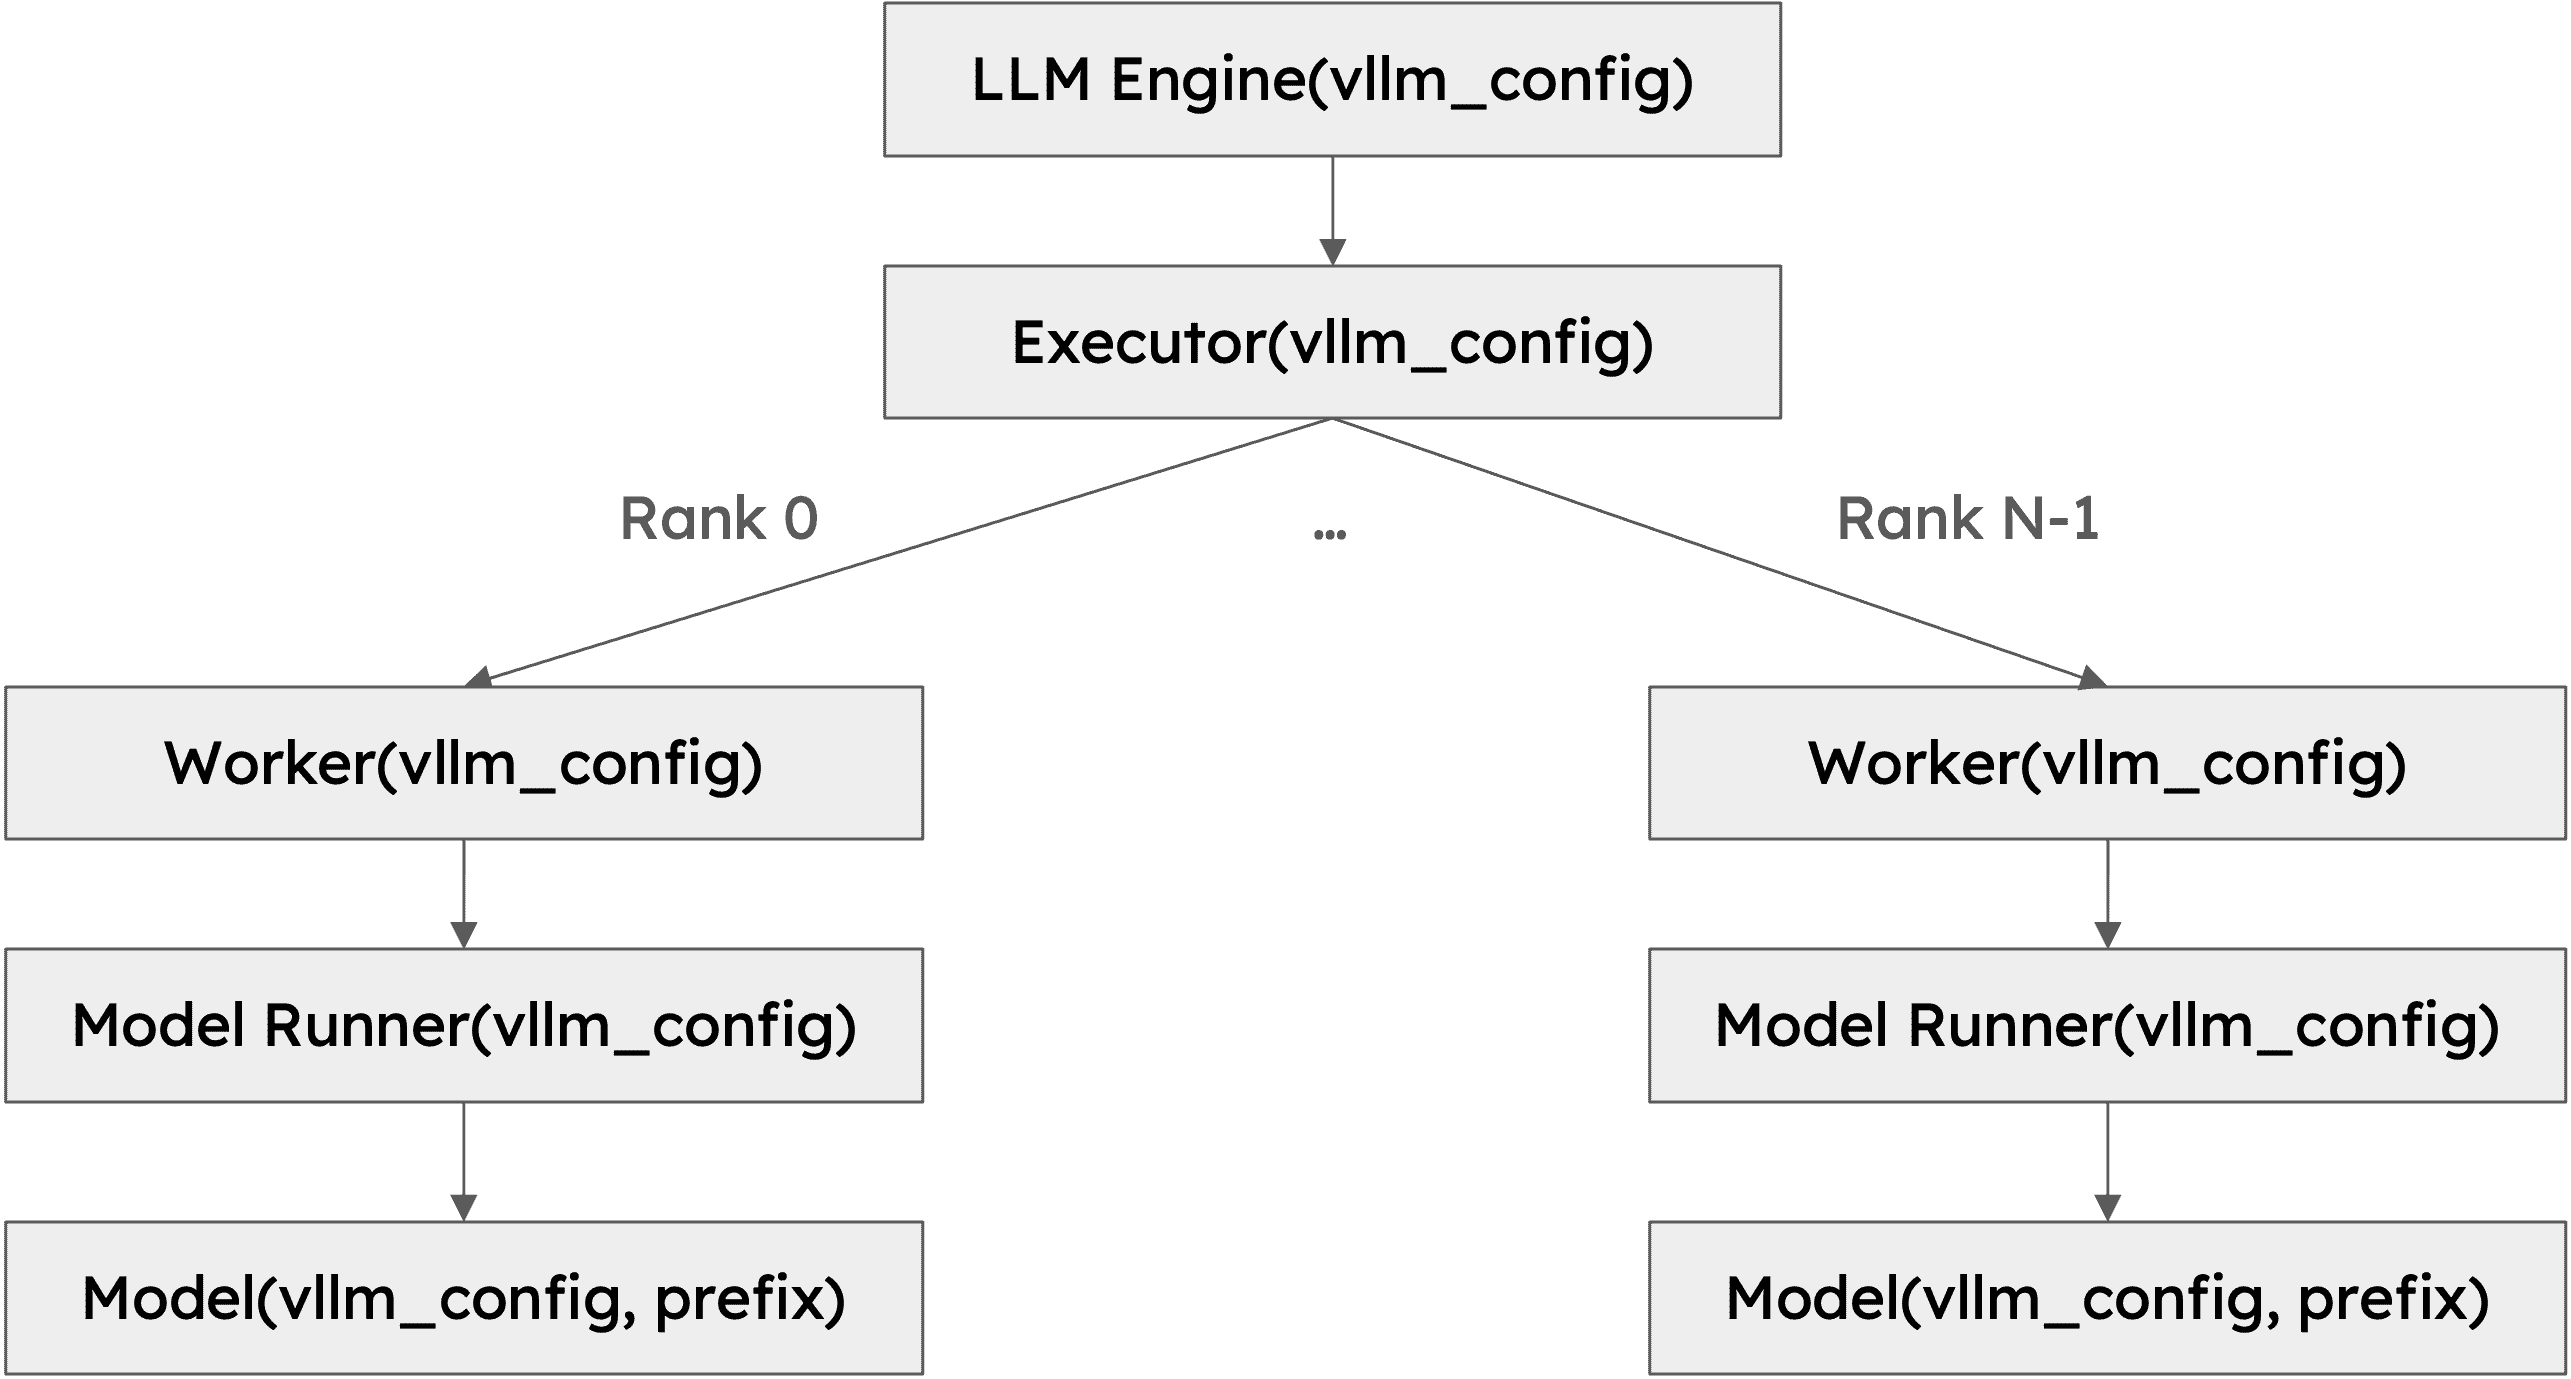
class hierarchy of vLLM
Input Processing
Input Processing Pipeline
Input data is passed to
LLMEngine(orAsyncLLMEngine).Tokenize the data if necessary.
- Process the inputs using
INPUT_REGISTRY.process_input For example, add placeholder tokens to reserve KV cache for multi-modal embeddings.
- Process the inputs using
Send the processed inputs to
ExecutorBaseDistribute the inputs via
WorkerBasetoModelRunnerBase- If the data contains multi-modal data, convert it into keyword arguments using MULTIMODAL_REGISTRY.map_input.
For example, convert a PIL.Image.Image input to its pixel values for a vision model.
vLLM Paged Attention
refer to vLLM paged attention block as “block”, while refer to GPU thread block as “thread block”
Inputs
template<
typename scalar_t,
int HEAD_SIZE,
int BLOCK_SIZE,
int NUM_THREADS,
int PARTITION_SIZE = 0>
__device__ void paged_attention_kernel(
... // Other side args.
const scalar_t* __restrict__ out,       // [num_seqs, num_heads, max_num_partitions, head_size]
const scalar_t* __restrict__ q,         // [num_seqs, num_heads, head_size]
const scalar_t* __restrict__ k_cache,   // [num_blocks, num_kv_heads, head_size/x, block_size, x]
const scalar_t* __restrict__ v_cache,   // [num_blocks, num_kv_heads, head_size, block_size]
... // Other side args.
)
三个最重要的参数:
q:          全局内存上需要的查询
k_cache:    键
v_cache:    值
在编译期间确定的模板参数列表:
scalar_t    表示查询、键和值数据元素的数据类型,例如 FP16
HEAD_SIZE   表示每个头中的元素数量
BLOCK_SIZE  指的是每个区块中的token数量
NUM_THREADS 表示每个线程块中的线程数
PARTITION_SIZE 表示张量并行 GPU 的数量(为简单起见,我们假设这是 0 并且张量并行被禁用)
Concepts
- Sequence:
A sequence represents a client request.
q 指向的数据的形状为 [num_seqs, num_heads, head_size] 。
这表示 q 指向了总共 num_seqs 条查询序列数据。
- Context:
The context consists of the generated tokens from the sequence.
例如, [“What”, “is”, “your”] 是 context token,输入查询token是 “name” 。该模型可能会生成token “?”
- Vec:
The vec is a list of elements that are fetched and calculated together.
- Thread group:
The thread group is a small group of threads(THREAD_GROUP_SIZE) that fetches and calculates one query token and one key token at a time.
- 示例:
如果线程组包含 2 个线程,头大小(head_size)为 8:
线程 0 处理索引 0, 2, 4, 6 的查询和键数据。
线程 1 处理索引 1, 3, 5, 7 的数据。
- Block:
The key and value cache data in vLLM are split into blocks.
- 示例:
如果块大小为 16,头大小为 128:
一个块可以存储 16 × 128 = 2048 个元素。
- Warp(线程束):
A warp is a group of 32 threads(WARP_SIZE) that execute simultaneously on a stream multiprocessor (SM).
职责:每个线程束一次处理一个查询令牌与一个块的键令牌之间的计算。
- 示例:
如果有 4 个线程束和 6 个块:
线程束 0 处理第 0 和第 4 块。
线程束 1 处理第 1 和第 5 块。
线程束 2 处理第 2 块。
线程束 3 处理第 3 块。
- Thread block:
A thread block is a group of threads(NUM_THREADS) that can access the same shared memory.
结构:每个线程块包含多个线程束(NUM_WARPS)。
职责:每个线程块处理一个查询令牌与整个上下文的键令牌之间的计算。
- Grid:
A grid is a collection of thread blocks and defines the shape of the collection.
In this kernel, the shape is (num_heads, num_seqs, max_num_partitions).
职责:每个线程块只处理一个头、一个序列和一个分区的计算。
Query
线程组的职责:每个线程组(thread group)负责获取一个查询令牌的数据。
线程的职责:每个线程只处理查询令牌数据的一部分。
- 线程束内的数据复用:
每个线程组会提取相同的查询令牌数据。
但不同线程组会将查询令牌数据与不同的键令牌数据相乘。
q_ptr:指向查询数据的指针
q_vecs:存储在共享内存中的查询向量
- 总结
如何通过指针 q_ptr 从全局内存中提取查询数据。
如何利用共享内存(q_vecs)存储和分配查询数据。
通过内存合并技术优化数据访问的性能。
Key
- 与 Query 的区别:
每个线程组在一次内核(kernel)运行中只处理一个查询令牌。
但对于键数据,每个线程组会在多次迭代中处理多个键令牌。
k_ptr:指向键数据的指针
k_vecs:存储在寄存器中的键向量
- 总结
这段话的核心是解释键数据在多线程中的读取和存储策略:
k_ptr 指向的动态性:在不同迭代中,指针会指向不同的键令牌数据。
寄存器存储优化:键数据存储在寄存器中,减少访问延迟。
内存合并优化:通过相邻线程的协同工作,最大化内存访问效率。
QK
查询和键向量的点积计算流程。
如何通过跨线程组的归约得到完整的点积结果。
利用共享内存和寄存器存储优化性能,同时减少内存访问开销。
Other
备注
需要的时候再学吧